Quantcast
Channel: virtuallyGhetto
Viewing all 217 articles
Browse latest View live

Detecting A Duplicate IP Address For Your ESXi Hosts Using a vCenter Alarm

$
0
0
The motivation for this article was a tweet I noticed from Duncan Epping this morning. Per Duncan's tweet, it looks like he may have accidentally assigned an IP Address to one of his virtual machines which was already being used by an existing ESXi host causing a duplicate IP Address error. We probably have all experienced this once in our lives and it can be quite difficult and frustrating to troubleshoot. Similar to a Windows OS, ESXi can also detect a duplicate IP Addresses but instead of a notification window, it is just logged in the VMkernel logs which looks like the following:
2013-01-21T15:52:35.989Z cpu1:2049)Tcpip_Vmk: 112: arp: 00:50:56:bd:3b:2b is using my IP address 172.30.0.213 on vmk1!
The biggest challenge of course is to identify which ESXi host actually has a conflict and then taking a look at the logs to find the offending MAC Address and shutting them down yourself or with the help of a Network Administrator. Wouldn't it be great if we had an alarm to automatically notify us when a duplicate IP Address is detected? Well I am glad you asked and the answer is YES! :)

In addition to logging to the VMkernel logs, ESXi also logs this "observation" in /var/log/vobd.log which stands for the VMkernel Observation. These "observations" can provide critical identifying information in case of an error and is usually used during troubleshooting. In our case, we are seeing an intermittent network connectivity to our ESXi host which is in result of a duplicate IP Address. The really neat thing about these VOBs is that you can create vCenter Alarms when a specific VOB has been detected. I have shown an example of this before in my Detecting ESXi Remote Syslog Connection Error Using a vCenter Alarm article.

We can do exactly the same for detecting a duplicate IP Address for an ESXi host. The first thing we need to do is identify the VOB ID by looking in /var/log/vobd.log:
2013-01-21T15:02:07.513Z: [netCorrelator] 917174784727us: [esx.problem.net.vmknic.ip.duplicate] Duplicate IP address detected for 172.30.0.83 on interface vmk0, current owner being 00:50:56:bd:3b:2b
We can see the VOB ID for this is esx.problem.net.vmknic.ip.duplicate and this will be used in our vCenter Alarm trigger.

Step 1 - Create a new Alarm and specify a name, the Monitor type will be Hosts and Monitor For will be for a specific event:
Step 2 - Copy the VOB ID that we have identified from above and specify that as our alarm Trigger:
Step 3 - If you wish to receive an email notification or send an SNMP trap go ahead and configure additional actions, else just click next which will just display a vCenter Server alert in the UI.

Now that our alarm has been created, we will want to give this a test drive .... who can we ask? Well it just happens that I have a new user in my environment and I provisioned him a new VM which is already connected to the network. Let's hope he does not try to change the IP Address (because this never happens, right?)
After the user statically assigns the IP Address of an existing ESXi host in the VM, we should see our new alarm trigger in vCenter.
As you can see, we have quickly identified the ESXi host that is impacted and we can then login to DCUI via the console to take a look at the logs to find the offending MAC Address. Hopefully duplicate IP Addresses is not a common problem in your environment but it does happen from time to time and having an alarm to help you quickly narrow down the culprit can be quite useful.

Monitoring vCenter SSO User Account Expiration

$
0
0
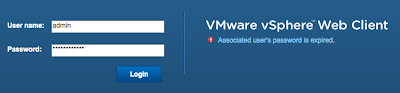
Did you know that user accounts created in the vCenter SSO Server automatically expire by default after 365 days? If you do not update your password prior to the expiration date, in about a years time you could potentially be locked out of your vCenter SSO Server which also applies to the admin@system-domain account.
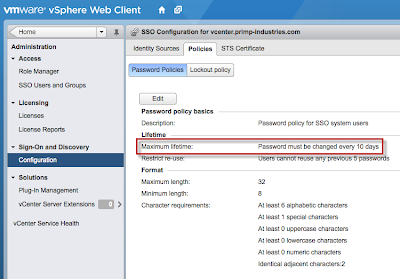
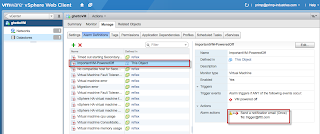
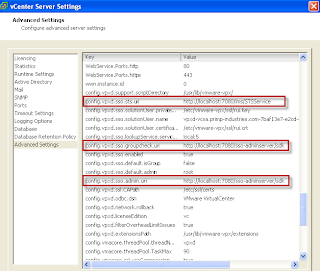
You can change the default password expiration policy by logging into the vSphere Web Client with an SSO Administrator account. Under the configuration section of "Sign-On and Discovery", there is a Password Policies tab that allows you can modify password policies. By default, this is set to 365 days. I would also recommend that after you have installed and setup your vCenter SSO Server, you add at least one user or group from your directory service such as Active Directory and assign it to the SSO Administrator group. This will ensure that you can still log in to the SSO configuration in the event the local SSO user accounts are locked out.
Even though you can change the password expiration policy, there is still no automated notification or alerting built-in for user accounts that are going to expire. The best you can do is to create a calendar event to remind you update your passwords prior to the expiration date. I am sure that many of you are anxious to add another color event to your already busy schedule :)

While investigating alternative options a few weeks back, the only method that I have found to retrieve the status for each SSO user is to directly connect to the vCenter SSO Database. There are two specific tables of interest, one which provides the current password policy and the other providing the last password changed date for each SSO user:
  • ims_authn_password_policy
  • ims_principal_data
Disclaimer: This "may" not be officially supported by VMware.

Instead of having you manually dig around in the SSO Database, I have created a Perl script called getSSOUserExpiration.pl which can connect to either a MSSQL or vPostgress backend SSO database. The script which will automatically list out the current password policy as well as user accounts that will be expiring in N days, where N is input provided by the user. You also have the ability to configure the script to automatically email you the results which is nice for a daily or weekly report and can be setup using a cronjob or a scheduled task. There are several configuration variables that will need to be adjusted based on your environment and these are all located within the script itself. For more details on how to setup and use the script, please take a look at the Setup and Configuration section below.

Note: To reduce any negative impact to the vCenter SSO Database, you should add or ask your DBA's to create a limited read-only account and limit access to the following tables above. You may even be able to have your DBA's create a scheduled routine for the specific queries and have that emailed to you internally.

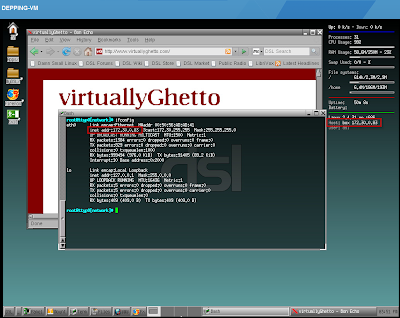
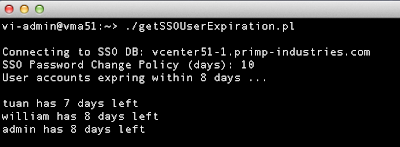
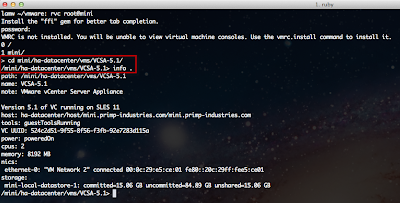
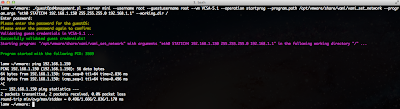
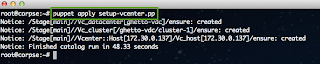
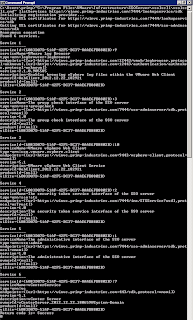
Here is a screenshot of connecting to a vPostgres backend Database:
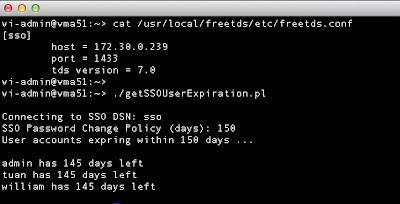
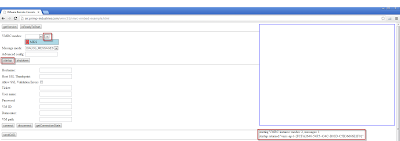
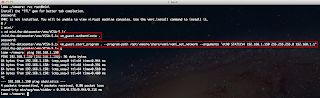
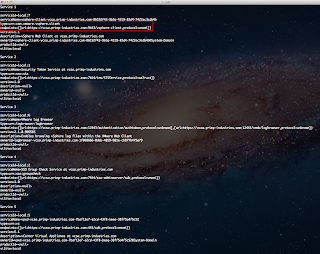
Here is a screenshot of connecting to a MSSQL backend database:
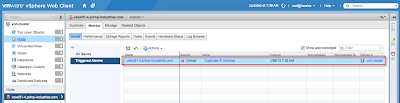
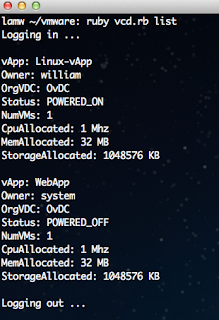
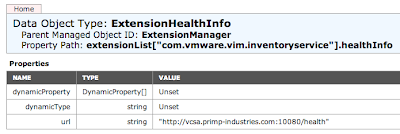
Here is a screenshot of what the email report looks like:

Note: The email body should contain the specific vCenter SSO Database, but I am not sure why it is not showing up in Gmail, but it does work for other email clients.

Setup and Configuration


vPostgres


To connect to a vPostgres DB, you will need to install the following two perl packages: perl-DBI and perl-DBD-Pg. In this example, I am using the vMA appliance and the zypper package installer. For more details on how to add a SLES repo, please take a look at the following article. I also assume if you are connecting to a vPostgres DB, then you are using the VCSA (vCenter Server Appliance) and by default it does not accept remote connections. We will need to also make two configuration changes to the VCSA for our script to be able to connect to the database. 

Step 1 - Run the following two commands to install both perl packages:
sudo zypper in perl-DBI
sudo zypper in perl-DBD-Pg
Step 2 - SSH into your VCSA and in the following configuration file /storage/db/vpostgres/pg_hba.conf you will need to add the network in which you will be connecting from:
host    all             all             172.30.0.0/24           trust
Step 3 - SSH into your VCSA and in the following configuration file /storage/db/vpostgres/postgresql.conf you will need to add the IP Address(s) that you want vPostgres to listen for remote connection. If you use "*", it will allow all addressees:
listen_addresses = '*'
Step 4 - For the changes to go into effect, you will need to restart the vPostgres DB by running the following command:
service vmware-vpostgres restart
Step 5 - Modify the getSSOUserExpiration.pl script and provide the credentials to your vCenter SSO DB. If you need help in identifying the vCenter SSO DB credentials, please refer to this article for the details.


MSSQL


To connect to an MSSQL DB, there are a few additional steps and packages that will be required. We will be using FreeTDS which provides libraries to connect to an MSSQL DB for UNIX/Linux platforms. There was a bit of trial and error in getting the MSSQL solution working and I would like to thank Reuben Stump for his assistance. The following article was used as a reference for the setup below.

Step 1 - Run the following two commands to install the required packages:
sudo zypper in perl-DBI
sudo zypper in gcc
Step 2 - Download and extract the contents of the FreeTDS package:
wget ftp://ftp.astron.com/pub/freetds/stable/freetds-stable.tgz
tar -zxvf freetds-stable.tgz
cd freetds-0.91
Step 3 - Compile and install FreeTDS under /usr/local/freetds:
export SYBASE=/usr/local/freetds/
./configure --prefix=/usr/local/freetds
make
sudo make install
Step 4 - Add your vCenter SSO Server details into the FreeTDS configuration file located in /usr/local/freetds/etc/freetds.conf
[sso]
        host = 172.30.0.239
        port = 1433
        tds version = 7.0
In the example above, I named my database entry "sso" but you can use any name and this will be referenced when editing the script in step 5.

Step 5 - Modify the getSSOUserExpiration.pl script and provide the credentials to your vCenter SSO DB.

How to Send vCenter Alarm Notifications to SMS & Other Online Services Using IFTTT

$
0
0
I just discovered a pretty cool free online service called IFTTT (If That Then This) which allows you to easily create what is known as a recipe that is composed of trigger and an action to send a notification. This can be thought of like a vCenter Alarm with a trigger and action, but in IFTTT's case, a trigger and action can be almost anything such as an email, facebook event, twitter, etc.
I stumbled onto IFTTT while going through some of my unread blog feeds this morning since I could not go back to sleep after randomly waking up at 4am in morning. I was reading an article from Matt Cowger about something called a Pebble which I had not heard of before and it peaked my interest. In reading about Pebble (pretty slick actually), I learned about IFTTT which is one of the notification systems Pebble supports. I decided to give IFTTT a try and to see how easy it would be to setup SMS notifications for a vCenter Server alarm.

Step 1 - Sign up for IFTTT account, you need to ensure the email account that you use to register is the same account that will be used to send the trigger.

Step 2 - Create a new Recipe using email as the trigger and SMS for the action. The process is very straight forward, just follow the wizard and at the end you will enter your phone number for SMS notification and confirm with a code.
Step 3 - Create a vCenter Alarm for the event you wish to trigger off of and set the email address to send to trigger@ifttt.com as noted in the Recipe.
Step 4 - In my test, I created an alarm for a Powered Off event and went ahead and powered off a VM to generate the alarm.
Step 5 - IFTTT checks the triggers every 15minutes. If you do not wish to wait 15minutes you can force a check by clicking on Check Now button in the Recipe.
Step 6 - If everything was setup correctly, you should have received a text message with the details of the vCenter alarm. In my Recipe, I configured it to only send the Subject which contains everything you would need to know about the vCenter alarm, at least for you to decide whether or not you want to investigate the issue.
The possibilities are pretty much endless in terms of the triggers and actions that you could create with IFTTT, I even created one for my ghettoVCB backup notification. The only downside that I noticed while giving IFTTT a try is that the trigger check is every 15minutes which could be a bit long for things requiring immediate attention, but I also read that there are certain Recipes that supports a "Quick Trigger" which would then execute immediately upon receiving. I think for a free service this is very cool and much easier than setting up your own SMS system. I would recommend giving IFTTT a try and see what cool Recipes you can build and integrate with your VMware or other environments.

I hope my body will let me crash and get some sleep now ...

How to Access vSphere Remote Console Using vSphere & VMRC API

$
0
0
Similar to my vCloud Director article, you can also provide access to the remote console of a virtual machine in a vSphere environment to your end users. This can be accomplished by leveraging both the vSphere and VMRC (Virtual Machine Remote Console) APIs and can be useful if you are building a custom portal for users to access their virtual machines. To use the VMRC API, you can download the latest VMRC 5.1 SDK which provides the following:
The VMRC SDK allows you to use a Web-based application to connect to a vCenter- or vCloud Director-managed virtual machine and access that virtual machine’s console in a browser window. You can interact with the virtual machine console input and screen. You can also use the VMRC SDK to manage virtual and physical device connections on a vCenter-managed virtual machine.
The VMRC SDK includes documentation to the API as well as a sample webpage implementing some basic functionality of the VMRC API. I recently received a question on how to get started with the sample as it was not completely intuitive and thought I take you through the required steps to get the sample working.

Step 1 - Download the VMRC 5.1 SDK and extract the contents to your local desktop.

Step 2 - Open the vmrc-embed-example.html using a web browser located in the docs folder.

Note: In my example, I uploaded both the javascript and html file to a web server and accessed the sample by connecting to the server instead of running it locally on my desktop. This was to show how users could access the custom portal using the VMRC SDK.

Step 3 - At the top of the page where it says "VMRC Modes", make "MKS" is selected in the drop down box and click on the "+" icon to add. Then go ahead and click on the "Start" button to start a VMRC instance and ensure you see a success message on the right hand side of the console box.
Step 4 - To authenticate to VMRC, you will need a session ticket which will be obtained through the use of the vSphere API using the acquireCloneTicket() method provided by the SessionManager managed object. In this example, we will be using the vSphere MOB to quickly retrieve our session ticket, but in a real implementation, you would programamtically retrieve the session ticket along with few othe pieces of information to connect to the VMRC. Open up a new tab in your web browser and connect to the following URL:
https://reflex.primp-industries.com/mob/?moid=SessionManager&method=acquireCloneTicket
Note: Make sure you substitute in your vCenter Server IP Address/Hostname

Once you have authenticated, go ahead and click on the "Invoke Method" which should generate a session ticket:
Step 5 - Copy the session ticket string and go back to our VMRC sample page. We will now need to fill out the following sections before we can access the remote console of a virtual machine:
  • Hostname (IP Address/Hostname of your vCenter Server)
  • Allow SSL Validation Errors (Check this if you are using self signed SSL certificates)
  • Ticket (Paste the session ticket from the previous step here)
  • VM ID (This is the MoRef ID of the VM you wish to connect to the remote console)
Once you have filled out the minimum required fields, go ahead and click on the "Connect" button and if everything was successful, you should now see the remote console of the virtual machine you selected.

Enable Auto Startup After Power Failure For Apple Mac Mini

$
0
0
I recently came across a very useful tidbit after receiving several inquires asking how to configure an Apple Mac Mini to automatically startup after a power failure. This is extremely useful for situations where power is eventually restored and you are not physically around to press the power button. Automatically starting up after a power failure is not a new feature of the Mac Mini and it actually exists on most modern day systems and can be configured using a variety of tools.

The challenge arises when you are running ESXi, how do you go about enabling this functionality in ESXi itself? Well the answer is actually quite simple, you can enable this outside of ESXi. Normally to enable this feature you can either run a setpci command on UNIX/Linux system or configure the energy saver settings in OS X. Several folks from the VMTN community such as zippytiff and twuhabro have already confirmed having success using the latter option when booting OS X off a USB or SD card to modify the energy saving settings.

I finally got a chance to look into this a bit more for myself and with a bit of research, I found several other methods which also works and may potentially be easier.

Note: I have heard that historically the auto startup flag has not persisted in older Apple hardware, but for the new Mac Mini 5,3 and 6,2, they seem to be persisting without any issue from my testing. YMMV depending on your hardware and/or firmware.

Method 1 (Configure in OS X)

If you already have OS X install on your Mac Mini, then you just need open up the System Preferences and enable auto startup under the Energy Saver section. Once that has been enabled, you can then perform your ESXi installation.

If you already have ESXi installed, then you can use either Method 2 or 3.

Method 2 (Configure using bootable Ubuntu on USB)

We can create a bootable Ubuntu image running off of a USB device (minimal footprint) and run the following setpci command to enable auto startup:
setpci -s 0:1f.0 0xa4.b=0
If you are interested in the gory details on the above command, please refer to this great article which breaks it all down for you. After you have created your Ubuntu image using the instructions in the above link, you can boot off of the USB device (Make sure to hold down ALT/OPT key so you can select to boot off of the USB device). Once Ubuntu has booted up, you will right click on the purple icon on the upper left hand corner and type in terminal.
You will then launch the terminal application and type the following to change over to root user.
sudo su -
Finally, you will enter the above setpci command which will enable the auto startup. At this point, you can type reboot and remove the USB device.

Method 3 (Configure using bootable OS X on USB)

Another method is to create a bootable OS X image running off of a USB device and change the power management settings by using the pmset utility. To enable auto startup, run the following command in the terminal:
pmset autorestart 1
You will need the original OS X installer and if you are using either Lion or Mountain Lion, you can use Lion DiskMaker to help you create the bootable USB image (Make sure to hold down ALT/OPT key so you can select to boot off of the USB device). Once the OS X installer boots up, at the top select Utilities and click on the Terminal application.
Go ahead and run the above command to enable auto start and then type reboot and remove the USB device.

The last thing to do of course is to actually test this out on your Mac Mini. Go ahead and let the system boot up and then yank the power cord and then give it a few seconds before plugging it back in. You should see the Mac Mini automatically power back on after you plug the power back in.

References:

How To Backup & Restore Free ESXi Host Configuration

$
0
0
ESXi host configurations can easily be backed up and restored using either the vCLI's vicfg-cfgbackup or PowerCLI's Get-VMHostFirmware cmdlet. These commands along with others that perform "write" operations are only supported when you have a (paid) licensed version of ESXi. If you are using free ESXi, the remote commands are only available for "read-only" operations. For more details, please refer to this article here.

Note: In my personal opinion, it is much quicker and more efficient to re-install ESXi and apply your configurations using either a scripted deployment such as kickstart or a combination along with post configuration scripts. Re-installs become extremely trivial when you centralize your ESXi host configurations, even for small setups. 

Having said that, if you are running free ESXi in a small shop or in a home lab and wish to backup your ESXi host configurations, you can still do so by leveraging a neat little tool called vim-cmd found within the ESXi Shell. There is a section under hostsvc/firmware which manages the ESXi host configuration which also uses the same vSphere APIs that both vicfg-cfgbackup & Get-VMHostFirmeware command uses.

Under this section of vim-cmd, there are four commands:
  • backup_config   
  • reset_config    
  • restore_config  
  • sync_config
Prior to actually backing up your ESXi host configuration, run the following command which will flush the ESXi configuration changes:
vim-cmd hostsvc/firmware/sync_config
To backup the ESXi host configurations, run the following command which will generate a file that will be automatically stored in /scratch/downloads and can also be downloaded from a web browser using the URL shown from the output:
vim-cmd hostsvc/firmware/backup_config
Before restoring your ESXi host configurations, you will need to ensure the file is renamed to configBundle.tgz and stored under /tmp directory. You will also need to ensure the ESXi host is placed in maintenance mode by running the following command:
vim-cmd hostsvc/maintenance_mode_enter
To restore the ESXi host configurations, run the following command and specify the backup configuration file which should reside in /tmp/configBundle.tgz:
vim-cmd hostsvc/firmware/restore_config /tmp/configBundle.tgz
Note: Upon completing the restore, it will automatically reboot your ESXi host.

Here is a screenshot using the above commands to backup and then restore ESXi host:
Note: You can not restore an ESXi host using a configuration file backed up from a different host.

Automating VCSA Network Configurations For Greenfield Deployments

$
0
0
If you deploy the VCSA (vCenter Server Appliance) or other virtual appliances directly onto an ESXi host,
you will notice the network configuration wizard for the virtual appliance is not available as you would expect when deploying to a vCenter Server.
The reason for this is that ESXi does not support some of the advanced OVF/OVA properties such as the Networking section and you will need to deploy the OVF/OVA to a vCenter Server to be able to configure these advanced options. This poses a problem if you need to deploy the VCSA in a greenfield environment where you will not have an existing vCenter Server running and you will be deploying directly to the ESXi host. Unless you have a DHCP enabled network, you will most likely need to manually go into the vSphere C# Client to change the network configuration as it was unable to obtain an IP Address.
Though this is a one time configuration, it is still not ideal and would require the use of a Windows system to access the vSphere C# Client. You can actually get around this by leveraging the GuestOperations API (previously known as VIX API) which allows you to perform operations within the guestOS that is running VMware Tools. The other nice thing about the GuestOperations API is that it does not require any network connectivity from the virtual machine.

Note: The GuestOperations API can be accessed in variety of ways and in this article I am demonstrating just two methods and does not require a Windows system. You can also access the GuestOperations API using PowerCLI if you are more comfortable with Windows and do not wish to use the vSphere C# Client to manually configure the network settings for the VCSA. I would also like to stress that though this article is about the VCSA, you can easily apply this to any VMware based virtual appliance or virtual appliance running VMware Tools.

The most important thing to identity before using the GuestOperations API is the specific command or program you wish to invoke and the argument it accepts. To configure the network configuration for the VCSA or any other VMware based virtual appliance, you would use /opt/vmware/share/vami/vami_set_network If you just run this command by itself, there are variety of options from IPv4 to IPv6, static or dhcp configuration. In our example, we will be configuring a Static IPv4 address for our VCSA and the command we would run is the following:
/opt/vmware/share/vami/vami_set_network "eth0 STATICV4 192.168.1.150 255.255.255.0 192.168.1.1"

Method 1 - Using RVC (Ruby vSphere Console)


RVC is a nice open-source tool for interactively managing and configuring your vSphere infrastructure. RVC can be installed on any platform, in this example, I am running RVC on my Apple OS X laptop.

Step 1 - We first need to deploy the VCSA OVA and we can do so by using the ovftool via the command-line which can also be installed on Mac OS X system.
Step 2 - We then login to our ESXi host using RVC.
Step 3 - Next we will need to "change directory" to the location of our VM, in this example my VCSA is called VCSA-5.1. We can then run the "info ." command to view the summary of our VM. We can see that our VM is powered on from our initial deployment and we are ready to apply our network configurations in the next step.
Step 4 - To be able to run the above command, we will need to first authenticate into the guestOS. To do so, we will run the "vm_guest.authenticate ." and we will be prompted for the VCSA password. By default, the command assumes the username is root but that can also be specified on the command-line. If you are successful, you should not see any errors and then we can run the "vm_guest.start_program" command. Run the following to set a IPv4 static IP Address:
vm_guest.start_program . --program-path /opt/vmware/share/vami/vami_set_network --arguments "eth0 STATICV4 192.168.1.150 255.255.255.0 192.168.1.1"
Note: All commands in RVC can be tabbed out with auto-completion.

If the command was successful, you can quit RVC and you should be able to ping the IP Address that you have just configured.

Method 2 - Using vSphere SDK for Perl Script


Awhile back I wrote a script called guestOperations.pl which is a vSphere SDK for Perl script that implements the new GuestOperations API. This is a generic script which can be used to remotely connect to either a vCenter Server or ESXi host and perform operations within a guestOS as long as VMware Tools is installed and running. In this example, I also have the vSphere SDK for Perl installed on my Mac OS X laptop, but you can also install this SDK on any platform as well.

Step 1 - We will first use the "validate" operation to ensure our credentials to the guestOS is correct, but more importantly ensure that VMware Tools is up and running.
If the operation was successful, we should see our guest credentials validated. If not, you may need to wait a minute or two while VMware Tools is still loading up.

Step 2 - To invoke the command to configure the network configuration, we will use the "startprog" operation and run the following:
./guestOpsManagement.pl --server mini --username root --guestusername root --vm VCSA-5.1 --operation startprog --program_path /opt/vmware/share/vami/vami_set_network --program_args "eth0 STATICV4 192.168.1.150 255.255.255.0 192.168.1.1" --working_dir /
If the command was successful, then you should now be able to ping the IP Address that you have just configured.

As you can see, with the use of the GuestOperations API, you can do more than just setup the network configuration for a VM, you can run pretty much any command within the guestOS as you normally would if you were to RDP or SSH in. This is a very powerful interface that you can leverage to help you automate your virtual machine deployment and configurations!

Why Are There Two VMX Files?

$
0
0
Have you noticed that for a powered on virtual machine in vSphere 5.1, there is now an additional VMX file that ends with an ~ (tilde) found within the virtual machine's configuration directory?
This was an observation that was made by a few folks and some thought it might be related to a virtual machine's lock file which is created when a virtual machine is powered on. After a bit of research, it turns out this extra VMX file is not a lock file but actually an "edit file". This edit file is a copy of the original VMX file and when changes are required, they are applied to the edit file first. Once the changes are complete, the edit file is then atomically swapped with the original VMX file which helps prevent potential VMX file corruption. In the worst case event where the original VMX file is somehow corrupted, the virtual machine can be restored using the edit file.

This is another reason why you should not be manually editing a virtual machine's VMX file, especially when it is still powered on. For any VMX configuration changes, you should be automating using the vSphere API through the use of either PowerCLI or the vSphere SDK for Perl. For more information on automating advanced settings across your virtual machines, please take a look at this article.

Exploring the vCloud API Using Ruby

$
0
0
While working on something that was completely random, I started to play around a bit with the Ruby programming language. I had a few questions and I reached out to a buddy of mine who is Ruby developer and in doing so I was introduced to a very cool Ruby gem called HTTParty. For those of you who are not familiar with Ruby gems, it is a packaged library or application for Ruby, similar to an rpm or pkg file. The neat thing about HTTParty is that it makes working with REST APIs extremely easy and processing XML request/responses into Ruby objects without too much effort.

With the bit of knowledge I gained from my buddy, I wanted to see how easy it would be to apply this to the vCloud API using Ruby and HTTParty. To my surprise, it was actually pretty easy!

Disclaimer: I am not a developer nor even a Ruby novice. This is probably the second or third time I have used Ruby.

Before getting started, you will need to have the following installed on your system:
The following vCloud APIs are implemented in the sample below:
To demonstrate the use of Ruby & HTTParty, I created a very simple Ruby script called vcd.rbwhich primarily deals with vApp operations.


To use the script, you will need to create a file called config-vcd.yml which contains the credentials to your vCloud Director instance. Here is what the file should look like:
:username: administrator@system
:password: supersecretpassword
:site: https://vcd.primp-industries.com
Note: This example assumes you are running vCloud Director 5.1 (but sample can be modified to support 1.5)

Here is an example of listing all vApps for the given Organization you are logging into:
Here is an example of listing a specific vApp:
Here is an example of performing several operations on the vApp:
At the end of this little exercise, I was pretty impressed at how easy it was to work with REST APIs using Ruby and HTTParty. I think the toughest part for me personally was getting used to Ruby's syntax which I was not familiar with. I also extended this exercise to the vCloud Networking and Security REST APIs which I will share in another blog post.

Useful Resources:

Exploring the vCloud Networking & Security API Using Ruby

$
0
0
In my previous article I demonstrated how you can easily use Ruby and the HTTParty Gem to access the vCloud API. As mentioned at the end of the article I also performed a similar exercise for the vCloud Networking and Security API and here is the sample Ruby script I reated called vcns.rb

Before getting started, you will need to have the following installed on your system:
You will also need to access to a vCloud Networking and Security 5.x environment to use this script.  To begin, create a file called config-vcns.yml which contains the credentials to your vCNS system and will be used to login. Here is what the file should look like the following:
:username: admin
:password: default
:site: https://vcns.primp-industries.com
The script provides the following output:
  • vCNS Configuration
  • vCNS Edge Gateway(s) Details
  • Syslog Service Details
  • HA Service Details
  • Firewall Service Details
  • DNS Service Details
  • SSL-VPN Service Details
  • IPSec Service Details
  • DHCP Service Details
  • NAT Service Details
  • Load Balancer Service Details

Here is a screenshot of running the vcns.rb script:
As you can see, you can easily implement any of the features provide from the vCloud Networking and Security API, with some basic knowledge of how the API works (of course the documentation examples help too!). To further demonstrate this, I thought for kicks and giggles, I would take a part of the script and apply it to another language, this time using PowerShell (yep, you heard right!).

Luckily, it turns out my colleague Alan Renouf already wrote an awesome little PowerShell module for vShield (vCNS) awhile back. With some knowledge of the vCNS API, it was trivial to add a new command called get-vShieldEdge which Alan did not have that would list all the vCNS Edge Gateways that have been deployed. 

Here is what the the code looks like in Ruby:
Here is what the code looks like for PowerShell:
Minus the language syntax, it looks pretty similar right? Both Ruby and PowerShell are accessing the same vCNS API. As long as you know how the API works, it is pretty easy to switch between programming/scripting languages.

To show the above code works, here is screenshot using the new get-vShieldEdge command:
If you are interested in further automation of vCNS, I would highly recommend you take a look at the vCloud Networking and Security API Programming Guide.

Useful Resources:

How To Run The SilverLining Fling Without Installing It In vCloud Director

$
0
0
A few weeks back the VMware Lab's team released a cool new fling called SilverLining which allows users to build a simplified user-interface for vCloud Director. This interface can be run from any modern web-browser that supports HTML5, CSS3 and Javascript. To access the SilverLining interface, you must first install it on a vCloud Director 5.1 Cell.
From a development or proof of concept perspective, it would be really nice to be able to run SilverLining locally from your desktop and point it to a valid vCloud Director 5.1 instance for testing. Well, this is exactly what Andrea Siviero, a Consulting Architect for VMware discovered while playing around with the SilverLining Fling.

Disclaimer: The solution described here is specifically for Chrome running on Mac OS X. I have not looked into equivalent settings for other browsers.

Here are the steps required to make this work:

Step 1 - Download SilverLining and extract the contents to your local desktop

Step 2 - Under Silverlining->js directory, there is a file called main.js that needs to be modified. Add the following right under "$(document).ready(function() {" which should point to the base URL of your vCloud Director instance:
localStorage.server = "https://vcd.primp-industries.com";
Step 3 - Launch Chrome with the additional argument via the command-line and load the index.html in the SilverLining directory:
open /Applications/Google\ Chrome.app/ --args -disable-web-security
Note: I have tried specifying --disable-web-security for the Windows version of Chrome, but it looks like this setting does not work for newer versions of chrome but may work for an older version based on some online threads I have found.

If everything was successful, you should be able to login to the vCloud Organization of your choice and see all the vApps and Catalogs you have access to!

If you receive the "You are attempting to connect to a system no longer supported" shown in the screenshot below:
You may be pointing to a vCloud Director instance that is using a self-signed certificate and you will need to trust the site before proceeding. To do so, open up a new tab and enter the following URL (substituting your vCloud Director URL):
https://vcd.primip-industries.com/api/versions
Click on the "Proceed Anyway" and then reload the index.html page and you should now be able to login to vCloud Director.

I would like to thank Andrea for sharing this awesome tip! Now you can easily develop and test your own custom interface using the Javascript SDK provided by SilverLining all on your desktop. Best of all, you can now point this to any remote vCloud Director 5.1 instance whether that be private or public!

How To Quickly Get Started With The New VMware Puppet Modules

$
0
0
Yesterday, VMware Automation gurus Nick Weaver and Nan Liu just announced the release of four awesome new VMware Puppet modules that can help you manage and configure vCenter Server (including ESXi) and vCloud Networking & Security (vShield). You can read all about the details here and here and if you were lucky enough to have attended PEX (Partner Exchange) you might even have caught the demo given by Nick in his session.

I have used Puppet in the past, but it was pretty limited and specifically in How to Deploy ESXi 5 Using Razor & Puppet. I thought this might be a good time to revisit Puppet and try out the new VMware Puppet modules. I took a look at some of the examples provided by Nan on his blog but for new users to Puppet, it may not provide enough details to quickly get started (including myself). I thought I document the minimal steps I took to quickly get started (I also ran into a few bugs which Nan has fixed).

Step 1 - Install Ubuntu Precise (Ubuntu Server 12.04 LTS - See more at: http://www.virtuallyghetto.com/2012/05/how-to-deploy-esxi-5-using-razor-puppet.html#sthash.c3anJPam.dpuf
Step 1 - Install Ubuntu Precise (Ubuntu Server 12.04 LTS). You can use other distros, I just choose Ubuntu as I had the image lying around.

Step 2 - Download Puppet Labs package repository by running the following commands:
wget http://apt.puppetlabs.com/puppetlabs-release-$(lsb_release -c | cut -f 2).deb
dpkg -i puppetlabs-release-$(lsb_release -c | cut -f 2).deb
apt-get update
Step 3 - Install all the necessary packages such as Ruby, Ruby Gems, Puppet, etc. by running the following commands:
apt-get install -y libxslt-dev libxml2-dev ruby rubygems puppet
gem install nokogiri
gem install net-ssh
Step 4 - Install the VMware Puppet modules by running the following command:
puppet module install vmware/vcsa
puppet module install vmware/vcenter
puppet module install vmware/vshield
To start using the VMware Puppet modules, you will need to create what's known as a manifest file that contains the resources which maps to the actions you wish to perform (e.g. configure a newly deployed VCSA appliance or create a Cluster in vCenter Server and add an ESXi host to that cluster). You can find a bunch of example manifest files in each of the Puppet modules, here is the path to each:
/etc/puppet/modules/vcsa/tests/
/etc/puppet/modules/vcenter/tests/
/etc/puppet/modules/vshield/tests/
You will see in some of the examples, they import a file in each directory called data.pp which contains the actual definitions of your VCSA, vCNS and ESXi hosts but you can also just specify that in the main manifest file as well for simplicity. The latter option provides more flexibility as you can easily reference various configurations for different environments. For your convenience, I have created the following manifest files that you can use and you just need to modify them to fit your environment.
Here is what my lab environment looks like and their respective IP Addresses for your reference (these must already be deployed and vCenter & vCNS does not need to be configured but just accessible over network):
vCenter Server = 172.30.0.135
vCloud Networking and Security = 172.30.0.136
ESXi Host = 172.30.0.137
Step 5 - As mentioned by Nan, a custom Rbvmomi was used and we will need to ensure our Puppet management host (Ubuntu system we are on) includes it. To ensure all the necessary packages are downloaded for us, we will use the rbvmomi.pp manifest file for our host and use Puppet to apply the policy. Replace management_server in rbvmomi.pp with the hostname or IP Address of your Ubuntu host and then run the following command:
puppet apply rbvmomi.pp
Note:  You can safely ignore the red warnings, it must not have liked something in my environment.

Step 6 - We will start off by configuring the VCSA so we can then perform operations such as adding in Datacenters, Clusters, ESXi hosts, etc. We will use the configure-vcsa.pp manifest file by running the following command:
puppet apply configure-vcsa.pp
Step 7 - Next we will create a Datacenter, Cluster and add our ESXi host by using the setup-vcenter.pp manifest file by running the following command:
puppet apply setup-vcenter.pp
Step 8 - We are now onto configuring vCloud Networking and Security and we will also associate it with our vCenter Server by using the configure-vcns.pp manifest file and running the following command:
puppet apply configure-vcns.pp
Step 9 - After configuring vCloud Networking and Security, we can now deploy a vCloud Networking and Security Edge Gateway to provide various networking services to our vSphere environment using the deploy-edge.pp and by running the following command:
puppet apply deploy-edge.pp

In about 5-10 minutes, you will have a fully configured vSphere environment that contains your vCenter Server, vCloud Networking and Security Manager and Edge Gateway and ESXi hosts all ready to start providing compute and networking services for your virtual machines and applications! I want to stress the above is a very simplistic example of what you can do with the new VMware Puppet modules. There are definitely more advanced capabilities provided in the modules and I would recommend you take a look in the samples directory of each module for more details. 
Overall, I was pretty impressed with the VMware integration that Nick, Nan and team built with Puppet. This was a great learning experience for myself, I learned quite a bit with just trying out these modules and I think I might have found a reason to dive more into Puppet! :)

Big thanks to Nan for helping me out with some of my Puppet questions! 
How to Deploy ESXi 5 Using Razor & Puppet

How To "Pause" (Not Suspend) A Virtual Machine In ESXi?

$
0
0
Last week I received a very interesting question from a fellow blogger asking whether it was possible to "pause" (not suspend) a virtual machine running on ESXi. Today ESXi only supports the suspend operation which saves the current memory state of a virtual machine to disk. With a "pause" operation, the memory state of the virtual machine is not saved to disk, it is still preserved in the physical memory of the ESXi host. The main difference with a "pause" operation is the allocated memory is not released and this allows you to quickly resume a virtual machine almost instantly at the cost of holding onto physical memory.

The use case for this particular request was also quite interesting. The user had an NFS server that housed about 200 virtual machines that needed to be restarted and the goal was to minimize the impact to his virtual machines as much as possible. He opted out from suspending the virtual machines as it would have taken too long and decided on a more creative solution. He filled up the remainder capacity on the datastore which in effect caused all virtual machines to halt their I/O operations. Though not an ideal solution IMHO, this allowed him to restart the NFS server and then run a script for the virtual machines to retry their I/O operation once the NFS server was available again.

Based on the above scenario, he asked if it was possible to "pause" the virtual machines similar to a capability Hyper-V provides today which would have provided him a quicker way to resume the virtual machines. Thinking about the question for a bit, a virtual machine is just a VMX process running in ESXi and I wondered if this process could be paused like a UNIX/Linux process using the "kill" command. Well, it turns out, it can be!

Disclaimer: This is not officially supported by VMware, use at your own risk.

Using the kill command, you can pause the VMX process by sending the STOP signal and to resume the VMX process, you can send the CONT signal. Before getting started, you will need to identify the PID (Process ID) for the virtual machine's VMX process.

There are two methods of identifying the parent VMX PID, the easiest is using the following ESXCLI command:
esxcli vm process list
The PID for the virtual machine will be listed under the "VMX Cartel ID" and in this example I have a virtual machine called vcenter51-1 and on the right I am pinging the system to verify it is up and running. An alternative way of identifying the PID is to use "ps" by running the following command:
ps -c | grep -v grep | grep [vmname]
Note: Make sure you identify the parent PID of the virtual machine if you are using the above command as you will see multiple entries for the different VMX sub-processes.

To pause the VMX process, run the following command (substitute your PID):
kill -STOP [pid]
To resume VMX process, run the following command:
kill -CONT [pid]
Here is a screenshot of pausing and then resuming the virtual machine. You can also see where the pings stop as the virtual machine is paused and then resumed. Once the virtual machine was resumed, it operated exactly where it left off with no issues as far as I can tell.
Note: I have found that if you have VM monitoring enabled, there maybe issues resuming the virtual machine. This should only be done if you have VM monitoring disabled as it may not be properly aware that the VMX process being paused on purpose. 

Though it is possible to pause a virtual machine, I am not sure I see too many valid use cases for this feature? Are there are use cases where this feature would actually be beneficial, feel free to leave a comment if you believe there are. For now, this is just another neat "notsupported" trick ;)

Using Google Authenticator To Provide Two-Factor Authentication For ESXi

$
0
0
Last year, I came across an interesting open source project called Google Authenticator, which provides two-factor authentication by using both a PAM (Pluggable Authentication Module) module and a mobile application for generating one-time passcodes. This project sparked my curiosity and I wanted to see if I could get Google Authenticator to run on ESXi to provide additional security by requiring two-factor authentication when attempting to login to the ESXi Shell. After several attempts, I failed to get Google Authenticator working on ESXi and eventually gave up. I reported the behavior I saw in my environment in the Issues section of the project which did not yield any responses and I thought that was the end of that experiment.

Almost eight months later, I received a surprising email from two VMware engineers who were also interested in the Google Authenticator project and were able to figure out how to get Google Authenticator to work on ESXi. In sharing their findings, it turns out that the solution was actually quite simple and it just required commenting out three lines of C Macros in the Google Authenticator source code (I will document this in a separate blog post). I was able to confirm the engineers findings in my home lab and was also able to build a custom Google Authenticator VIB for ESXi to help with the setup. 

Disclaimer: This is not officially supported by VMware, use at your own risk

Installing Google Authenticator Custom VIB / Offline Bundle


Prerequisite:
  • Ensure that your ESXi host's clock is in sync with a proper time source (skew should be < 4minutes)
  • Keep a separate SSH connection open to your ESXi host, in case something goes wrong you can easily revert the changes else you can potentially lock yourself out

Step 1 - Download either the Google Authenticator VIB vghetto-google-auth.vib or offline bundle vghetto-google-auth.zip and upload it to the datastore of your ESXi host

Step 2 - You will need to change the acceptance level of your ESXi host to Community Supported as this is a requirement for any custom VIBs created. Run the following ESXCLI command:
esxcli software acceptance set --level CommunitySupported
Step 3 - To install Google Authenticator VIB, you will need to run the following ESXCLI command and specify the full datastore path of the VIB:
esxcli software vib install -v /vmfs/volumes/mini-local-datastore-1/vghetto-google-auth.vib -f
To install the Google Authenticator offline bundle, you will run the same command but instead of using the -v argument, you will specify the -d

Step 4 - You can verify the Google Authenticator was installed successfully by running the following ESXCLI command:
esxcli software vib get -n vGhetto-goog-auth


Configuring Google Authenticator & ESXi Configurations


Step 1 - Download the Google Authenticator app for your mobile phone. In this example, I am using the iPhone's Google Authenticator mobile app. 

Step 2 - Next you will need to configure Google Authenticator for the ESXi host, run the google-authenticator command in the ESXi Shell which will start the setup. 
You should see a URL as well as the secret key which you will need to enter into your Google Authenticator mobile app. You can either manually add your ESXi host into the mobile app by entering the secret key OR copy and paste the URL into a web browser which provides a QRC code that the mobile app can just read. 
For all the prompted questions, you can use yes for the defaults.

Step 3 - You will need to add the following configuration to your SSHD configuration under /etc/ssh/sshd_config
ChallengeResponseAuthentication yes
Step 4 - You will also need to add the following entry to the following PAM configuration files /etc/pam.d/login and /etc/pam.d/sshd
auth   required   pam_google_authenticator.so
To add the entry into both files on the ESXi Shell, run the following two commands:
sed -i -e '3iauth       required     pam_google_authenticator.so\' /etc/pam.d/login
sed -i -e '3iauth       required     pam_google_authenticator.so\' /etc/pam.d/sshd
Note:  To ensure the above configuration persists after a reboot, you will need to add the two sed commands to /etc/rc.local.d/local.sh for ESXi 5.1 or /etc/rc.local for ESXi 5.0 hosts which will automatically add the entries upon bootup. 

Finally, you will need to restart the SSH daemon for the changes to go into effect by running the following command:
/etc/init.d/SSH restart

Step 5 - To validate that everything was configured correctly, open a new SSH session to your ESXi host. Instead of seeing the usual password prompt, you should now see a verification code prompt. Open up your Google Authenticator mobile app and enter the code that is displayed for your ESXi host and then enter the root password.
If everything was correct, you should now be authorized and logged into your ESXi host

Though the configuration could be a bit more automated including adding each ESXi host to your mobile application, this is a pretty nifty and free solution to provide two-factor authentication for your ESXi hosts. I am curious to see if others are interested in such functionality within ESXi or if this would be useful? Feel free to leave a comment.

Big thanks to VMware engineers who helped me get this solution to work!

Thank You For Your Vote & Support!

$
0
0
The results for the Top 25 Virtualization Blogs was just posted a few days ago by Eric Siebert of vSphere-Land.com and I am very proud and honored to announce that virtuallyGhetto has moved up from last year's #8 spot to the #6 spot on the list! I am also very honored that virtuallyGhetto was also voted as the #1 scripting blog! This was quite a surprise to me especially when you are up against guys like Alan Renouf and Luc Dekens.

I also wanted to take this opportunity to thank Eric for all of the time and effort he has put into setting up the site and tallying up all the votes, this is not an easy task. I would also like to thank all of my readers for voting and for your continued support. Finally, I would like to congratulate all the bloggers and give a special shout out to some of the new guys who made the top 25 this year like Michael Webster, Chris Wahl and of course the Storage Guru himself and my good colleague Cormac Hogan! Congratulations guys! I am really humbled to be part of such a talented and passionate community, there is no other like it!

I do not want to spoil the results, so be sure to watch the special vChat results episode and visits Eric's site for the full list.


How To Compile Google Authenticator for ESXi

$
0
0
In my previous article I demonstrated how to use Google Authenticator to provide two-factor authentication for ESXi using the custom VIB that I had built. In this article, I will show you how to compile Google Authenticator to run on ESXi as well as an additional customizations that can be made to the source code to support multiple users.

Disclaimer: This is not officially supported by VMware, use at your own risk

Prerequisite:
  • Download and install 32-bit Linux distribution. In my lab, I used latest CentOS 6.2
  • Install pam-devel package (CentOS) or libpam0g-dev package (Ubuntu). You can reference this blog here for more details on installation
  • Ensure you have both gcc and make installed

Step 1 - Download Google Authenticator source code by running the following command:
wget http://google-authenticator.googlecode.com/files/libpam-google-authenticator-1.0-source.tar.bz2
Step 2 - Extract the source code by running the following command and change into the libpam-google-authenticator-1.0 directory:
tar -jxf libpam-google-authenticator-1.0-source.tar.bz2
cd libpam-google-authenticator-1.0
Step 3 - Edit pam_google_authenticator.c and towards the top of the file comment out the following three lines which should look like this:
Step 4 - By default the SECRET file is stored in /.google-authenticator and we canchange the path by modifying both google-authenticator.c and pam_google_authenticator.c by editing the SECRET macro file which should look like the following:
Google Authenticator supports multiple users by default and you can also provide this support in ESXi by leveraging the $USER OS environmental variable within the SECRET file location. This would allow each user to generate and store their own SECRET file. To do so, set the path to /etc/vmware/$USER/.google-authenticator and the username will automatically be populated when configuring Google Authenticator for each user. 

Note: If you are going to create a custom VIB and would like to support multiple users, you will need to know the usernames in advance so you can create the dummy .google-authenticator file for each user. This is required so the files will automatically persist after setting up Google Authenticator. 

Step 5 - Save the changes and then type "make" which will then compile the source code and produce google-authenticator binary and PAM module pam_google_authenticator.so in the same directory.

Step 6 - If you decided to create your own custom VIB, ensure you include an empty secret file so when you go and configure it, the changes will be saved. If you do not wish to lower the acceptance level of your ESXi host for the custom VIB, an alternative trick is to store the google-authenticator binary and PAM module in a local datastore as well as the secret file and copy them over using either /etc/rc.local.d/local.sh for ESXi 5.1 or /etc/rc.local for ESXi 5.0. Here is a sample of what that should look like:

vSphere Security Hardening Report Script Updated for vSphere 5.1

$
0
0
A public draft of the vSphere Security Hardening Guide for vSphere 5.1 was released a few weeks back by my colleague Mike Foley. Since then I have been asked by several people if I had a chance to update my vSphere Security Hardening Report Script. The answer was unfortunately no due to other projects I had been working on and this script as well as others are maintained outside of my normal day job. I finally found some time this past weekend to go through the 5.1 revision of the hardening guide and make the necessary updates to my script which includes a few additional checks.

The script continues to provide backwards compatibility to previous releases of the vSphere Security Hardening Guide for vSphere 5.0, 4.1 and 4.0. Maintaining this compatibility is actually quite a challenge due to small minor changes in the hardening guide from previous versions, but I am please to say the latest 5.1 draft has now been implemented.

Disclaimer: This script is not officially supported by VMware, please test this in a development environment before using on production systems.  

Here is a sample output for the Security Hardening Report for a subset of my vSphere 5.1 home lab environment using "profile1" check:
vmwarevSphereSecurityHardeningReport-SAMPLE.html

For more details about the security hardening script, please refer to the documentation here.

If you have any feedback/questions on the vSphere Security Hardening Guide itself, make sure you to leave your comments and questions here. If you have any feedback/questions regarding the script, please join the vSphere Security Hardening Report VMTN Group for further discussions.

Automate vCenter Orchestrator Configuration Backups

$
0
0
Last year I wrote an article on how to quickly configure a new vCenter Orchestrator 5.1 appliance which automatically goes through the necessary steps of configuring your vCO appliance and enabling the vCenter Server plugin and associating it with your vCenter Server. These steps are usually performed manually, but when you are looking at deploying multiple vCO instances or even quickly spinning up vCO appliance for testing, this will definitely help speed up your deployment. 

Something that I did not consider after completing the vCO setup was backups. Fortunately, this was something that was shared with me recently from a customer who had this exact workflow on backing up their vCO configuration after their initial deployment. This may not be a very well known feature, but vCO provides a very simple mechanism to export your vCO configurations and allows you to restore the configuration in case of a miss-configuration or even deploying a similar configuration to another vCO instance.
Using the same HTTP request trick, to export the vCO configuration you would need to make a request to the following URL:
https://${VCO_IP_ADDRESS}:8283/config_general/ExportConfig_export.action
Similar to the vCO UI, the backup will be stored on the vCO appliance itself and the path will be provided back to you in the message response. To help demonstrate this, I created a simple shell script called backupVCO51.sh which is similar to the setup script in my previous blog article. You can easily take the few lines of code and integrate that with the setup script.

Here is a screenshot of running the backup script:
From the output we can see where the backup configuration is stored on the vCO appliance and you can easily copy the backup to an external system using SCP.

Whether or not you are automating your vCO setup, you should definitely consider performing periodic backups of your vCO configuration, especially before making any changes to your vCO Server.

How to Update vSphere Infrastructure Navigator (VIN) After Changing vCenter Server IP Address

$
0
0
If vSphere Infrastructure Navigator (VIN) is deployed in your environment and you change the IP Address of the vCenter Server, VIN will no longer function even after a reboot. The reason for this is that when VIN first registers with the vCenter Server, information is generated and stored within VIN such as the IP Address as well as security thumbprint. Since the IP Address of the vCenter Server has changed, we simply just need to re-register VIN with the vCenter Extension vService.

In my lab I have VIN deployed and connected to a vCenter Server (note the IP Address 172.30.0.229):
I then update the vCenter Server's IP Address to 172.30.0.230 which will break communication with VIN. To resolve this, start off by shutting down the VIN appliance. Once it is shutdown, edit the settings and click on "Manage->vServices" and at the bottom click on the Edit button. Next change the Provider drop down to "No Provider" and then click OK.
Now we will reset the Provider back to the vCenter Extension vService by going through the same workflow again but now selecting "vCenter Extension vService" as the provider.
You will also notice at the bottom there is a validation message and you should also see the new IP Address of your vCenter Server. Once you are done, click OK to save the settings and then power back on your VIN appliance. Once VIN is up, connect to the vSphere Web Client and you should be able to see your VIN data again!

Dude, Where's My vCenter Server 5.1 Components Installed At?

$
0
0
You would be surprised at the number of times I have heard this question get asked and this is not regarding the installation path but the specific server a given vCenter Server 5.1 component is installed on. I am just wondering if people are somehow miss-placing their infrastructure? I would hope that most organizations have some type of CMDB (Configuration Management Database) even if it is just a spreadsheet or at a minimum a memorable hostname. In any case, this question is only relevant for those of you who decided to separate out the vCenter SSO (Single Sign-On) Server, vSphere Web Client, Inventory Service and the vCenter Server and are now wondering where a given component is installed at. 

To begin, you will need to know at a minimum where your vCenter Server is installed at. If you do not know that, then you should take the walk of shame and install this utility (be-careful with port scanning tools, as it may not be allowed by your Security Operations team). Go to the advanced settings of your vCenter Server and look up one of the following settings:
  • config.vpxd.sso.sts.uri
  • config.vpxd.sso.groupcheck.uri
  • config.vpxd.sso.admin.uri
All three of these settings should contain the same hostname or IP Address which is the location of where your SSO Server is installed. You can also find this information by looking at the vCenter Server configuration file located in the following location:
Windows vCenter Server: C:\ProgramData\VMware\VMware VirtualCenter\vpxd.cfg
vCenter Server Appliance: /etc/vmware-vpx/vpxd.cfg
Next, you will need to login directly to your vCenter Server (RDP or SSH) depending on the version you are using. Using the hostname or IP Address of our vCenter SSO Server, we will now connect to the Lookup Service which is installed alongside the vCenter SSO Server. This service will provide us with the location of all services registered to vCenter SSO and we will be able to identify the location of the remainder vCenter Server components.

For Windows vCenter Server, make sure you have the JAVA_HOME environmental variable set to C:\Program Files\VMware\Infrastructure\jre and open up a command prompt and run the following (subsitute in the hostname or IP Address of your vCenter SSO Server):
"C:\Program Files\VMware\Infrastructure\SSOServer\ssolscli\ssolscli.cmd" listServices https://winvc.primp-industries.com:7444/lookupservice/sdk
We can take a look at the serviceName which describes the specific vCenter Server component such as the vSphere Web Client or Log Browser and endpoints property will tell you which server it is installed on.

For vCenter Server Appliance, there is a similar command by running the following:
/usr/lib/vmware-sso/bin/vi_regtool listServices https://172.30.0.186:7444/lookupservice/sdk
The only vCenter Server component that we have not found is the Inventory Service. To find the server where this component is installed, we just need to look at the vCenter Server Extensions and and we can simply open up a web browser and connect to the following URL (substitute in your vCenter Server address):
https://vcsa.primp-industries.com/mob/?moid=ExtensionManager&doPath=extensionList[%22com.vmware.vim.inventoryservice%22].healthInfo
Hopefully at this point you are able to figure out where all your vCenter Server 5.1 components are installed at and you are also documenting all this information in your CMDB or spreadsheet :)
Viewing all 217 articles
Browse latest View live