Quantcast
Channel: virtuallyGhetto
Viewing all 217 articles
Browse latest View live

Forwarding Logs From The vCloud Suite To vCenter Log Insight

$
0
0
An exciting new product was just announced last week by VMware called vCenter Log Insight, which will be part of the vCenter Operations Management Suite when released. The announcement also includes a public beta for customers to try out the new log analytics product that allows administrators to easily get an understanding of both their physical and virtual infrastructure through the collection of log data. You can get more details on how vCenter Log Insight works by checking out this article by the Jon Herlocker, who is in the Office of CTO and focusing on vCenter Log Insight.

I had known about vCenter Log Insight for quite sometime now and like others within VMware, I had the opportunity to test drive the product early on and provide feedback to the engineering team. One of neatest thing about vCenter Log Insight, in my opinion, is the simplistic setup and the tight integration between vCenter Server and vCenter Operations Manager. During the setup of vCenter Log Insight, I was reminded about an article that I had written about forwarding vCenter Server logs to a syslog server. I thought, would it not be cool if we could forward logs from other products within the vCloud Suite to vCenter Log Insight using the same syslog-ng trick? I decided to compile a list of logs from each of the products within the vCloud Suite shared that internally and thanks to my colleague Michael White who also help vet the list by circulating it within engineering.

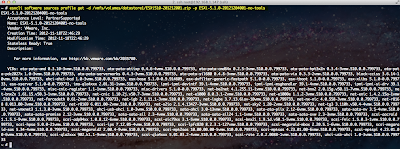
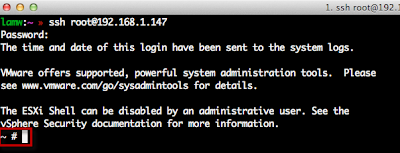
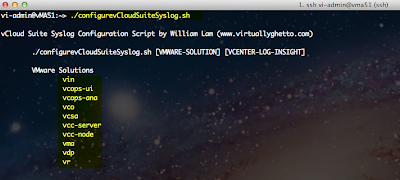
I then decided to create a very simple script called configurevCloudSuiteSyslog.sh that would allow users to easily configure each of the vCloud Suite products to forward their appropriate logs to vCenter Log Insight. The script is very simple to use, you just need to scp the script to one of the supported appliances within the vCloud Suite and specify the VMware solution name and the IP Address of your vCenter Log Insight Server.
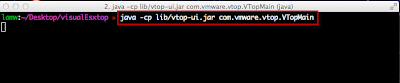
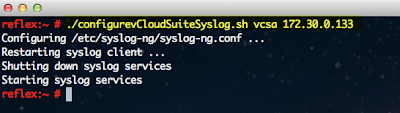
Here is an example of running the script on the VCSA (vCenter Server Appliance):
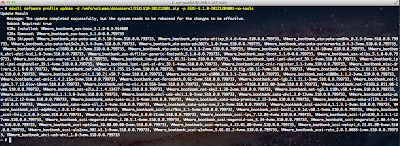
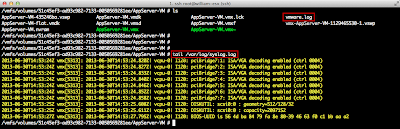
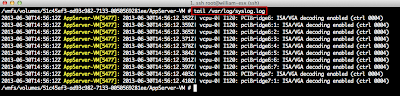
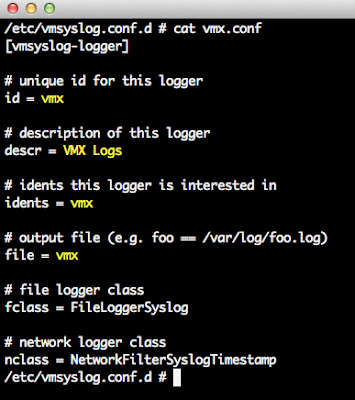
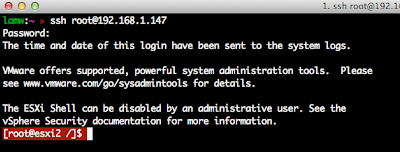
Based on the VMware solution selected, the appropriate logs will be appended to /etc/syslog-ng/syslog-ng.conf to be forwarded off to your vCenter Log Insight Server. The syslog-ng client will automatically be restarted for the changes to go into effect as part of the script. In my environment, I have deployed the majority of products within the vCloud Suite installed and have configured each of them to forward their logs to vCenter Log Insight. This can be very useful from a troubleshooting perspective and being able to view and filter through all the relevant logs from a single location.

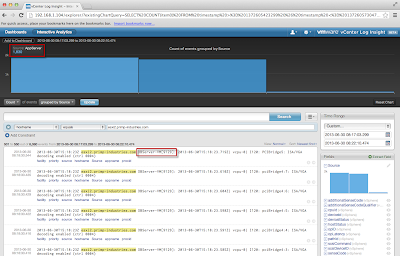
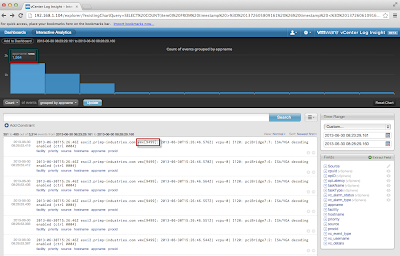
It was really interesting to see what the next "chattiest" VMware solution was from a log perspective in my environment, which turned out to be VIN after vCenter Server and ESXi host. I hope to see deeper integration between vCenter Log Insight and the rest of the vCloud Suite in future releases, but for now, if you have not tried out vCenter Log Insight, I would highly recommend you give it a try and provide any feedback you may have in the dedicated VMTN community forum.

If you are interested in the specifics logs that are being collected for each of VMware products, you can find the complete list below. Not all products from the vCloud Suite are listed here and some such as vCloud Director and vCloud Networking & Security provide native syslog configuration from the application standpoint which can be configured using either their UIs or APIs.

vCenter Operations Manager Analytics (VCOPS):
/var/log/vmware/diskadd.log
/var/log/vmware/vcops-admin.log
/var/log/vmware/vcops-firstboot.log
/var/log/vmware/vcops-watch.log
vCenter Operations Manager UI (VCOPS):
/var/log/vmware/admin.log
/var/log/vmware/ciq-firstboot.log
/var/log/vmware/ciq.log
/var/log/vmware/diskadd.log
/var/log/vmware/lastupdate.log
/var/log/vmware/mod_jk.log
/var/log/vmware/vcops-admin.cmd.log
/var/log/vmware/vcops-admin.log
/var/log/vmware/vcops-firstboot.log
/var/log/vmware/vcops-watch.log
/var/log/vmware/diskadd.log
/var/log/vmware/vcops-admin.log
/var/log/vmware/vcops-firstboot.log
/var/log/vmware/vcops-watch.log
vCenter Orchestrator (VCO):
/opt/vmo/app-server/server/vmo/log/boot.log
/opt/vmo/app-server/server/vmo/log/console.log
/opt/vmo/app-server/server/vmo/log/server.log
/opt/vmo/app-server/server/vmo/log/script-logs.log
/opt/vmo/configuration/jetty/logs/jetty.log
vCenter Server Appliance (VCSA):
/var/log/vmware/vpx/vpxd.log
/var/log/vmware/vpx/vpxd-alert.log
/var/log/vmware/vpx/vws.log
/var/log/vmware/vpx/vmware-vpxd.log
/var/log/vmware/vpx/inventoryservice/ds.log
vCloud Connector Node (VCC):
/opt/vmware/hcagent/logs/hca.log
vCloud Connector Server (VCC):
/opt/vmware/hcserver/logs/hcs.log
vSphere Data Protection (VDP):
/space/avamar/var/log/av_boot.rb.log
/space/avamar/var/log/dpnctl.log
/space/avamar/var/log/dpnnetutil-av_boot.log
/usr/local/avamar/var/log/dpnctl.log
/usr/local/avamar/var/log/av_boot.rb.log
/usr/local/avamar/var/log/av_boot.rb.err.log
/usr/local/avamar/var/log/dpnnetutil-av_boot.log
/usr/local/avamar/var/avi/server_log/flush.log
/usr/local/avamar/var/avi/server_log/avinstaller.log.0
/usr/local/avamar/var/vdr/server_logs/vdr-server.log
/usr/local/avamar/var/vdr/server_logs/vdr-configure.log
/usr/local/avamar/var/flr/server_logs/flr-server.log
/data01/cur/err.log
/usr/local/avamarclient/bin/logs/VmMgr.log
/usr/local/avamarclient/bin/logs/MountMgr.log
/usr/local/avamarclient/bin/logs/VmwareFlrWs.log
/usr/local/avamarclient/bin/logs/VmwareFlr.log
vCloud Director (VCD):
/opt/vmware/vcloud-director/logs/vcloud-container-debug.log
/opt/vmware/vcloud-director/logs/vcloud-container-info.log
/opt/vmware/vcloud-director/logs/jmx.log
vSphere Infrastructure Navigator (VIN):
/var/log/vadm/system.log
/var/log/vadm/engine.log
/var/log/vadm/activecollector.log
/var/log/vadm/dbconfig.log
/var/log/vadm/db/postgresql.log
vSphere Management Assistance (VMA):
/var/log/vmware/vma/vifpd.log
vSphere Replication (VR):
/var/log/vmware/hbrsrv.log

Will Intel’s VMCS Shadowing Feature Benefit VMware’s Nested Virtualization?

$
0
0
For many years now, VMware customers have been using Nested Virtualization, which is the ability to run a hypervisor such as vSphere ESXi within a virtual machine. Even though Nested Virtualization is not officially supported by VMware, customers have come to rely upon this technology for their lab environments and sometimes even production environments. VMware also heavily relies on this technology for their own internal development as well as their Hands On Lab for VMworld, which is now offered as an online SaaS (Software-as-a-Service) solution called Hands On lab Online.
Performance of Nested Virtualization has come a long way since its first introduction and it continues to get better with advancements made in hardware from both Intel and AMD. A couple of months back, I came across an article discussing a new feature from the upcoming Intel Haswell processor’s called VMCS Shadowing which aims to improve the performance of Nested Virtualization. This got me thinking about whether VMCS Shadowing could benefit VMware’s Nested Virtualization.

VMCS (Virtual Machine Control Structure) Shadowing works by reducing the frequency in which the guest VMM (virtual machine) requires assistance from the parent VMM. Its goal is to eliminate the VM-exits due to VMREAD and VMWRITE instructions executed by the guest hypervisor but this comes at a slight expense.

I reached out to one of the core engineers who helped to develop VMware’s Nested Virtualization technology, Jim Mattson, and asked whether or not we would benefit from the VMCS Shadowing feature. Well, it turns out that VMCS Shadowing can help, but we have also done some research in this area and developed some technology that would allow us to eliminate about 75% due to VMREAD and VMWRITE when running guest VMware Hypervisors using some interesting software techniques. The details of these software techniques are actually published in a research paper called Software Techniques for Avoiding Hardware Virtualization Exits on VMware’s Academic Program which is part of VMware Labs. Jim is one of the authors of the research paper and I would highly recommend you check it out if you are interested in more details.

To summarize, because of the techniques described in the paper, VMCS Shadowing will provide only a small benefit when running a VMware Hypervisor as virtual machine. However, it will greatly benefit other non-VMware Hypervisors running as a virtual machine, this is particular true for Hypervisors that perform egregious number of VMREAD and VMWRITE operations and that do not cluster well, such as VirtualBox for example.

The coolest part about the research and software techniques developed by Jim and team, is that the technology has already been incorporated into the existing VMware vSphere ESXi, Workstation and Fusion products. I often times forget that all the awesome-sauce technology that is being developed by VMware starts out in research academia and you can learn about other research topics by visiting the VMware’s Academic Program which includes publications, research papers and the popular VMware Technical Journals.

Creating Custom vSphere Reports is a Breeze with CloudPhysics

$
0
0
Creating reports is a common task that every vSphere administrator must deal with at least once if not many more times in their career. Whether you are tasked to provide an inventory report of all your virtual machines and their configurations to your manager or to provide a compliance report for your security team to ensure that all virtual machines are hardened according to the vSphere Security Hardening Guide, report creations can be a challenge.

The vSphere platform provides a very powerful and rich set of APIs (Application Programming Interface) that can be consumed by both vSphere administrators as well as developers. However, there is a high learning curve when using the API and it takes quite a bit of time to learn and of course your manager is expecting the report to be done in the next 5 minutes. Even with abstraction tools such as PowerCLI, quickly building a robust, scalable and performant script is not always a trivial task, not to mention the maintenance and updates to the script because your manager wants to continually add more things to the report.

So how can we make reporting so easy that vSphere administrators will no longer have to spend time digging through API documentation and instead they will be able to quickly put together reports within minutes? Well, this is something that the CloudPhysics team has been working on as part of their CloudPhysics card platform and they have built a very unique card solution to help solve this problem. I had the opportunity to get an early preview of this new card and I have to say that I am very impressed at how easy and intuitive the interface is to build simple to very complex reports using this new card solution. The coolest part of this solution is that no programming or scripting skills are required!

To give you an example on how easy it is to use the interface, I recently helped a customer with a script to identify all virtual machines that had a virtual disk using the 2gbsparse disk format. I would like to think I know the vSphere API pretty well, so putting the script together took just a few minutes because I knew exactly where to look for this information. That evening I decided to go through the same scenario, but using the new CloudPhysics card solution and I was literally able to create the report in seconds! It probably took me longer to name the report than to actually create it. As you can see, I am pretty excited about the new card solution and it will be interesting to see all the cool new reports customers can now create and share with each other.

Here is a sneak peak at what the interface looks like when creating your own custom reports:
Here is the final report that is produced:
As you can see, I have quickly narrowed down the specific virtual machine that contains a 2gbsparse VMDK and I am able to see exactly which virtual disk that is. 

If you would like to learn more about the new card solution, Irfan Ahmad, CTO of CloudPhysics will be hosting a live webinar to go over this new solution next Tuesday, June 25th at 9am PST and I would highly recommend you register for it to learn more.

Below is a bit more details on what you can expect from the webinar and you can register here.

vSphere Analytics Without Writing Code: The Quest for Missing Reports
While vSphere, the best-of-class virtualization platform, brings great efficiencies to the datacenter, reporting still presents challenges and pain to sys admins on a daily basis. CloudPhysics offers a radical new way to complete reporting for your virtual infrastructure. In addition to 20 high-impact reports, you can easily build your own and share the report template and output. When asked for asset reports, trending, activity, auditing and more, you’re never more than a few clicks away from delivery.
  
In addition to best practices and secrets to amazing mashups, you’ll learn to:
  • Create easy, visual reports for your vSphere environment
  • Add multiple vCenters in one view
  • Automate the report generation


Quick Tip - Listing Image Profiles From an ESXi Patch Using ESXCLI

$
0
0
I was cleaning out a few of my to-do items (list just keeps getting longer everyday) this morning and there was a question that I received a few weeks back asking how to retrieve the list of Image Profiles for a given ESXi patch. This is actually quite easy and you will want to use ESXCLI.

Note: The examples shown below is using ESXCLI on the ESXi Shell, but these commands can be execute remotely as well using ESXCLI or through PowerCLI with Get-EsxCli cmdlet.


To list the available Image Profiles for an ESXi patch, run the following command (ensure you substitute the full path to your ESXi patch):
esxcli software sources profile list -d /vmfs/volumes/datastore1/ESXi510-201212001.zip

To get more details on a particular Image Profile, run the following command and specify the -p for the specific Image Profile:
esxcli software sources profile get -d /vmfs/volumes/datastore1/ESXi510-201212001.zip -p ESXi-5.1.0-20121204001-no-tools

 To install/update a specific Image Profile, run the following command with the Image Profile name:
esxcli software profile update -d /vmfs/volumes/datastore1/ESXi510-201212001.zip -p ESXi-5.1.0-20121204001-no-tools

If you just want to install the ESXi patch, run the following command which will install the esx-base Image Profile by default which will include everything:
esxcli software vib update -d /vmfs/volumes/datastore1/ESXi510-201212001.zip
To check for the Image Profile you have installed on your ESXi host, run the following command:
esxcli software profile get

Here are some additional resources for ESXi patch management that may also be useful:

Required vSphere Privilege for Read-Only RESXTOP View

$
0
0
Yesterday I received a question about the specific vSphere privilege that is required to view RESXTOP data on an ESXi host. The reason for this request was to create a restricted role for a group of users who only needed to have access to RESXTOP performance data. I did not know the answer off the top of my head, but it was a pretty easy to narrow down the specific privilege with a quick test in my lab.

Through the process of elimination, it turns out you just need the Global.Service managers privilege to view only RESXTOP data. It may not seem intuitive, but the Service Manager is responsible for providing vSphere API access to both RESXTOP as well as vScsiStats interfaces which I have written about here.

In my lab, I created a new role called resxtop and then associated the role with the user(s) within the vSphere inventory. You can centrally manage this using vCenter Server or you can do this directly on an ESXi host, but you will need to ensure the role is create on each and every single ESXi host along with it's user association.

New Windows 8.1 Preview on vSphere 5.1 Update 1

$
0
0
Apparently Microsoft has just released a new tech preview of Windows 8 ... oh, wait. Sorry, I meant 8.1 (I guess all the cool kids now have a dot one in their release names ;)) I am not exactly sure what is new in this release, but I have been hearing rumors about some start menu thing?

For those of you who are interested in trying out the new Windows 8.1 Preview, you can easily run it on the latest version of vSphere which is 5.1 Update 1 which officially supports Windows 8. To create the VM, you just need to select the latest virtual hardware version which is 9 and Windows 8 (64 or 32 bit) as the guestOS type.

Here is a screenshot of Windows 8.1 Preview running in my home lab environment:
In addition to the OS, I have also successfully installed VMware Tools, VMXNET3 network driver and an HD Sound Card to the new Windows 8.1 VM and everything seems to be running fine without any issues.
Note: You should also be able to run Windows 8.1 Preview on latest version of VMware Fusion and Workstation, but this is not something I have tested.

Well, now that I am done sharing it is time to delete this VM. I need my home lab resources for more important things :)

How to Quickly Get Started with VMware vSphere & OpenStack?

$
0
0

Kenneth Hui recently published a number of interesting articles diving into the latest VMware vSphere integration with the OpenStack Grizzly release called OpenStack For VMware Admins: Nova Compute With vSphere Part1 and Part2. There has definitely been a lot of chatter around OpenStack lately and I agree with Kenneth, there is also a lot of confusion around the topic in general. Although I have not used OpenStack personally, one very important concept to understand is that OpenStack is really just a framework that allows you to build aCloudsolution that is comprised of the best of breed products that can then be plugged into the underlying compute, network, storage and management infrastructure.

One example of this is OpenStack's Nova compute component which supports a variety of Hypervisor solutions including KVM, XEN and now also VMware vSphere. Another example is OpenStack's Neutron (formally Quantum) networking component which also supports a variety of networking platforms including the leader in this space which is VMware's Nicira NVP (Networking Virtualization Platform).

Having said all that, since I have never worked with OpenStack before, I thought this would be a great opportunity to give OpenStack a test run with my vSphere home lab environment. With a quick Google search, I found an OpenStack Wiki guide for setting up VMware's Nova integration and I thought I should be able to just follow that. As it turns out, some of the commands no longer function due to some recent code changes in OpenStack and the instructions were also incomplete for a few steps. With the assistance of the OpenStack development team at VMware, I was able to get everything working and I wanted to share the details while the Wiki gets corrected.

Here is a diagram of what a vSphere and OpenStack solution could look like and we will be primarily focusing on the Nova component:

Pre-requesites:
  • vSphere ready environment with vCenter Server and at least one ESXi host (I recommend using the vCenter Server Appliance for quick setup)
  • vanilla installation of Ubuntu 12.04 LTS (you can find more details here)

Here is what my vSphere inventory looks like and the nice about this is you can use an existing vSphere environment. As you can see I have my Apple Mac Mini running ESXi, which is also hosting my vCenter Server along with my OpenStack virtual machine.

Installation:

Step 1 - Install git and we will be using that to clone out the latest DevStack which is basically a huge shell script that helps you quickly stand up an OpenStack instance for testing/development as it is not a trivial task to install OpenStack. Run the following commands on your Ubuntu OpenStack host:
sudo apt-get -y install git
git clone http://github.com/openstack-dev/devstack.git
cd devstack
Step 2 - Next we will need to setup a Tun/Tap interface which can do userspace networking and this helps ensure we do not mess with our primary interface (eth0) that is used to connect to the OpenStack VM. Run the following commands:
sudo ip tuntap add dev tapfoo mode tap
sudo ifconfig tapfoo 172.30.0.1 up
Note: You can select any IP Address that is not being used, I chose 172.30.0.1
To confirm the software interface was created correctly, you can run the ifconfig command and you should see a "tapfoo" interface with the IP Address that you had specified from above.

Step 3 - Now we need to create a file called localrc in the devstack directory with the following configurations listed below which will be used by DevStack to build and configure our OpenStack instance.
ENABLED_SERVICES=g-api,g-reg,key,n-api,n-crt,n-cpu,n-net,n-cond,n-sch,rabbit,mysql,horizon
VIRT_DRIVER=vsphere
VMWAREAPI_IP=192.168.1.127
VMWAREAPI_USER=root
VMWAREAPI_PASSWORD=vmware
VMWAREAPI_CLUSTER=Cluster
DATABASE_PASSWORD=nova
RABBIT_PASSWORD=nova
SERVICE_TOKEN=nova
SERVICE_PASSWORD=nova
ADMIN_PASSWORD=nova
FLAT_INTERFACE=tapfoo
HOST_IP=192.168.1.143
SCREEN_LOGDIR=/home/primp/devstack-logs
SYSLOG=True
SYSLOG_HOST=192.168.1.104
SYSLOG_PORT=514
The configurations in BLACK are required, where as the ones in GREEN are optional and I will explain those in a bit. 

VMWAREAPI_IP is the IP Address of your vCenter Server
VMWAREAPI_PASSWORD is the password of your vCenter Server
VMWAREAPI_CLUSTER is the name of the vSphere Cluster if you have one, else you can leave it blank
HOST_IP is the IP Address of your OpenStack Ubuntu host

Optional configurations:

SCREEN_LOGDIR will log all the OpenStack logs to a directory of your choice. By default, DevStack will log to standard out and only visible through the Screen sessions of each component which is not very user friendly nor easy for troubleshooting.

If you wish to forward OpenStack logs to a remote syslog host, you can also enable the following three configurations which should be pretty straight forward:

SYSLOG=True
SYSLOG_HOST is the IP Address of your remote syslog host (more details on this towards the bottom)
SYSLOG_PORT is the port of your remote syslog host, default will be 514

Note: If you want to learn about other DevStack localrc options, take a look a the documentation here
Step 4 - We are now ready to build and deploy our OpenStack instance. To start, just run the following command:
./stack.sh
This process will take a few minutes depending on how fast your system is and the connection to download all the necessary packages. If everything was successful, you should see a summary about logging into your OpenStack instance and the URL for the Horizon UI as shown in the screenshot below.
Step 5 - Go ahead and confirm you can access the Horizon UI by opening up a browser and pointing it to the IP Address of your OpenStack instance.
Step 6 - To start using OpenStack, we will need to first upload a virtual machine disk to OpenStack's Glance component which handles VM images. There is a sample Debian VMDK that is available on the OpenStack Wiki that we will be downloading to our OpenStack instance. To do so, we will set our credentials on the command-line for the next step and perform a wget to download the VMDK by running the following commands:
source openrc demo demo
wget https://www.dropbox.com/s/utvri5bw3zztty6/Debian-flat.vmdk
Step 7 - We will now use the following Glance CLI to upload our virtual disk and we can also list it once it is uploaded:
glance image-create --name Debian --is-public=True --container-format=bare --disk-format=vmdk --property vmware-disktype="preallocated" < Debian-flat.vmdk
glance image-list
Step 8 - To deploy a new instance of the image we have just uploaded, we will switch over to the Nova CLI and specify the Image ID from the previous step and run the following command which will deploy to our vSphere environment.
nova boot --image --flavor 1 my-first-openstack-vm
nova list
Step 9 - We can continue to run "nova list" to view the status, but it would be more interesting to see this from the Horizon UI. You can head over to the OpenStack UI and see the progress under the Instances tab.
Once the VM is ready, we should see an IP Address assignment and the status set to ready and the VM should show powered on.
To confirm that we have actually provisioned the VM onto our vSphere compute cluster, we can login to either the vSphere Web Client or vSphere C# Client and we should see our newly deployed VM running.
If you wish to deploy using the Horizon UI, you can go to Project -> Instances -> Launch Instance and go through the wizard selecting the image, specifying a name and configuration flavor and then click on Launch once you are ready to deploy.
Step 10 - Once you are finished, you can run the ./unstack.sh command which will reset and clean up your environment and delete any images that were uploaded. Again, DevStack is not meant for running production workloads, but can be used for quickly testing or developing against OpenStack. You can also view the consoles of each of the OpenStack components by using screen -x stack.

Using DevStack, you can quickly get a basic OpenStack instance up and running without too much hassle but this is not to say that OpenStack is easy or trivial to install. If this is your first time, I would highly recommend configuring your localrc to store the logs in a directory so you can either go through them if you run into any issues or more likely forward it over to an OpenStack expert to help you decipher. I personally had ran into a few issues and it was partially due to some errors in the Wiki, but troubleshooting can be like search for a needle in a haystack. 

DevStack Syslog Configuration


If you recall earlier in the localrc configuration, there is a section that specifies remote syslog configurations for the OpenStack instance. Since I am a fan of the new vCenter Log Insight product that was just released as a beta from VMware, I thought it would be neat to forward the OpenStack logs to it. After a bit of trial and error, it turns out that DevStack configures rsyslog (which is the syslog daemon) running on the Ubuntu host to forward logs using RELP format which is not supported by vCenter Log Insight. If you want to get this working, you will need to disable RELP format by tweaking the rsyslog configuration in /etc/rsyslog.d/90-stack-s.conf

You will need to replace :omrelp:
*.*             :omrelp:192.168.1.104:514
to just @@:
*.*             @@192.168.1.104:514
Finally, you need to restart the rsyslog service for the changes to take effect by running the following command:
service rsyslog restart
If we login to our vCenter Log Insight UI, we should now see our OpenStack instance logging remotely. Once you unstack and run stack, the configurations will default back to the original.

Additional Resources:

How to Run VMware's New Fling VisualEsxtop on Mac OS X

$
0
0
The folks over at VMware Labs continue to pump out awesome new Flings and just yesterday, they released another one called VistualEsxtop, which is an enhanced version of esxtop and resxtop. It is no surprise, the Fling was developed by VMware Engineers working in the Performance group such as Priya Sethuraman, Zhelong Pan, Haiping Yang and Joanna Guan, some of which who helped develop the original esxtop utility.

VisualEsxtop can connect to directly to an ESX(i) host or a vCenter Server and provides support going all the way back to ESXi 3.5 or vCenter Server 4.0. Here is a summary of all the features for VisualEsxtop:

Features

  1. Live connection to ESX host or vCenter Server
  2. Flexible way of batch output
  3. Load batch output and replay them
  4. Multiple windows to display different data at the same time
  5. Line chart for selected performance counters
  6. Flexible counter selection and filtering
  7. Embedded tooltip for counter description
  8. Color coding for important counters
While reading the instructions, I noticed VisualEsxtop is supported on both Windows and Linux and is loaded by a simple .bat or .sh script. So I wondered if it could run on Mac OS X? Well, it turns out the script uses a utility called readlink which does not operate the same on Mac OS X and will thrown an error. However, since VisualEsxtop is just a Java application, you can manually load the VisualEsxtop and the necessary library files.

To do so, you just need to change into the visaulEsxtop directory and run the following command:
java -cp lib/vtop-ui.jar com.vmware.vtop.VTopMain
Note: For ease of use, you can even create a shell script which executes the command so you do not have to type it out each time.

You should now see visualEsxtop launch after executing the above command:

One really cool feature of VisualEsxtop is the use of color coating for important counters and issues. In the screenshot below, you can see I have a VM that is dropping packets and it is automatically highlighted for me.
I would highly recommend you check out VisualEsxtop and add this to your toolbelt of tools for troubleshooting and diagnosing performance issues in a vSphere environment! If you have any feedback or questions for the engineers, please leave them in the comment section of the VisualEsxtop Fling.

Emulating an SSD Virtual Disk in a VMware Environment

$
0
0
I continue to be amazed everyday at all the awesome features and challenges being tackled by our VMware Engineering organization and yesterday was another example of that. There was a question that was posed internally about emulating an SSD device for a Nested ESXi environment running in VMware Fusion. I figure this would be an easy answer and pointed the user to a blog article I had written a few years ago on how to fake an SSD device in ESXi using SATP claim rules via ESXCLI. It turns out, one of the engineers knew of a better way of emulating an SSD Virtual Disk that can be consumed beyond just Nested ESXi VMs but also for any other guestOSes that supports SSD devices.

So why would you want to emulate an SSD device? Well for a vSphere environment, you may want to try out the new Swap to Host Cache feature from a functional perspective to see how it would work. You might be developing a script to enable this feature and having a "fake" SSD device would allow you to create such a script and test it. For other guestOSes, maybe you want to see how the system would react to an SSD device, perhaps drivers or configurations maybe needed and you would like to run through those processes before installing a real SSD device.

So the solution is actually quite simple and it is just an advanced setting in the Virtual Machine's configuration file (VMX) which can also be appended to using either the vSphere Web Client, vSphere C# Client or the vSphere API. This setting is only supported on Virtual Machines that is running virtual hardware 8 or greater. To configure a specific virtual disk to appear as an SSD, you just need to add the following:
scsiX:Y.virtualSSD = 1
where X is the controller ID and the Y is the disk ID of the Virtual Disk.

This configuration presents to the guestOS the mediumRotationRate field of the SCSI inquiry pages 0xB1 and sets the value to 1 and the guests will then report it as a solid-state device. As you can see, this can benefit more than just running Nested ESXi, you can also do various testing on other guestOSes that you require a "fake" SSD device.

Note: Though you can emulate an SSD device, it is no substitute for an actual SSD device and any development or performance tests done in a simulated environment should also be vetted n a real SSD device, especially when it comes to performance.

It is also important to note that reporting of an SSD device will highly depend on the guestOS, here is a high level table on how some of the common guestOSes recognize SSD devices.
GuestOSSSD Reporting
Windows 8IDE, SCSI and SATA disks can be recognized as SSDs
Windows 7IDE and SATA disks can be recognized SSD, but SCSI as mechanical
Linux (Ubuntu & RHEL)IDE, SCSI and SATA disks can be recognized as SSDs
Mac OS XSATA can be recognized as SSDs, but IDE and SCSI as mechnical

Here is a screenshot of a Nested ESXi host with an emulated SSD device:
Here is a screenshot of the new Windows 8.1 Preview with an emulated SSD device:
Note: Though I demonstrated this using vSphere, this also works for VMware Fusion (tested this personally), Workstation and Player. The only requirement is that you are running virtual hardware 8 or greater and that your guestOS supports reporting SSD device.

From a Nested ESXi perspective, I will definitely be using this method instead of using ESXCLI to go through the SATP claim rules, this is much easier to remember. I would also like to thank Regis Duchesne for sharing this tip and Srinivas Singavarapu and the virtual devices team for developing this awesome feature. You guys ROCK!

VMware Software Defined Kit

$
0
0
A hobby of mine when I am not playing with VMware technologies and such is riding on my road bike. I was pleasently surprise to find out this week that my VMware cycling kit has finally arrived! The cycling kit was designed by small group of VMware employees in their free time and Scott Jobe has been managing all the orders and logistics for the past few years. When I had first joined VMware and heard about this, I had just missed the deadline for submitting my order. This year, I made sure to keep an eye out once the new kits were available for order. With a holiday this week, I took my new kit out for a spin and it fits and looks great. I even dropped by our office for a quick picture :)
I would like to thank Scott and the team for putting all of this together, I know it took a lot of time including the re-makes, but I am sure everyone is enjoying their new VMware kits! Thank you!

Here are some additional pictures of the items I had purchased. All the clothing were custom printed by Louis Garneau.

Jersey (front & back)


Vest (front & back)

  Bib (front & back)

Arm Warmers & Gloves


A Hidden vSphere 5.1 Gem - Forwarding Virtual Machine Logs (vmware.log) to Syslog Part 1

$
0
0
Using the new vCenter Log Insight product, you can easily forward application logs from various products within the vCloud Suite for easy analysis and troubleshooting. However, one very important set of logs that we have not been able to collect in the past is the virtual machine logs (vmware.log) which are stored in the working directory of a virtual machine. These logs can be extremely useful from a VMware GSS perspective such as when a virtual machine panics, or if you need to rebuild the .VMX configuration file using these logs or for even general VM auditing purposes.

A recent conversation that I had with Daniel de Sao Jose, who works in our VMware GSS organization reminded of a neat little vSphere 5.1 feature that Daniel had shared with me awhile back. The feature allows you to configure a virtual machine to forward its vmware.log to ESXi's syslog file as well as storing them in the virtual machine's working directory. At the time, there were still a few open questions that required some additional testing and I made a note of this on my ever growing to-do list. I finally around to this and finish up the testing.

To enable this feature, you will need to add the following advanced virtual machine setting:
vmx.log.destination = "syslog-and-disk"
This of course can be enabled using either the vSphere Web Client or vSphere C# Client as well as automated, take a look at this article for more details.

Here is a screenshot showing showing the contents of the vmware.log in the ESXi host's syslog which is located in /var/log/syslog:
Note: The vmware.log is only generated when a virtual machine is powered on.

You also have the option of disabling the local vmware.log from being created in the virtual machine's working directory and only forwarded to ESXi host's syslog. To do so, you would change the advanced virtual machine setting to the following:
vmx.log.destination = "syslog"
By default, the log entries will be identified by the keyword vmx and the specific virtual machine's process ID such as vmx[5313]. However, this is not very user friendly and would still require you to query the VM PID to get the virtual machine name. This can be a challenge if you are viewing the logs from a centralized syslog server such as vCenter Log Insight where you potentially could have logs being forwarded from hundreds if not thousands of ESXi hosts.

To help with this, you can specify the string in which the virtual machine will identify itself when forwarding its logs using the following advanced virtual machine setting:
vmx.log.syslogID = SOME STRING
It made the most sense to me to set this to the name of the virtual machine, so you can easily identify the source of the logs. Here is a screenshot showing the name of the virtual machine instead of the generic "vmx" string.
If you have configured your ESXi host to forward its logs to vCenter Log Insight, you can see how easy it is to view individual virtual machine logs with a click of a button isolating on the syslog source.
One caveat that I would like to mention with this solution is that you are now storing all virtual machine logs in the ESXi hosts syslog file which is also logging other things about the ESXi host. This would cause the local logs to rotate much more frequently on the ESXi host due to the verbosity when powering on and off a virtual machine. This may not be an issue if you are forwarding to a remote syslog server, but ideally it would be nice to have separate log file primarily for the virtual machine logs. In Part 2 of this article, we will take a look at how we can accomplish this by extending ESXi's logger component.

Whitepaper: Migrating From VIX API to the vSphere Guest Operations API

$
0
0
The VMware VIX API in my opinion is still one of the most powerful and undervalued API's that is available to customers and partners for Virtual Machine guest operating system Automation. The VIX API allows you to perform guest operations such as starting/stopping an application, file/directory manipulation, uploading/downloading files all within the guest operating system without requiring any network connectivity to the Virtual Machine. This is all made possible through the use of VMware Tools that is running inside of the Virtual Machine and operations are only performed after a user of the guestOS is properly authenticated.
Guest Operations using vSphere API
The use cases for such an API are endless:
  • Network reconfiguration (Re-IP for DR or miss-configuration)
  • Operating System configurations
  • Application configurations or deployments (example of this)
  • Backup/Restore for individual files
  • Downloading log files for troubleshooting
  • The list goes on ....

The VIX API was first introduced as a separate client API supporting VMware's hosted products such as VMware Fusion, Workstation and Player and later supported VMware vSphere. The API was quite popular for the hosted products and with the release of vSphere 5.0, the VIX API was finally integrated into the vSphere API to provide a single API that could manage all aspects of vSphere as well as these new guest operations APIs for your Virtual Machines. With this integration, these new APIs are now known as the vSphere Guest Operations API.

If you are familiar with the VIX API and would like to move or migrate to using the new Guest Operations API within vSphere, there is a really useful whitepaper that I recently came across called Transporting VIX Guest Operations to the vSphere API that provides a nice mapping of the API methods between the VIX and new vSphere Guest Operations API. The whitepaper also includes various code samples using Java, PowerCLI cmdlets and vSphere SDK for Perl to demonstrate the new Guest Operations APIs.

I think every vSphere administrator or developer should be familiar with the capabilities of the VIX and Guest Operations API and how it can help them further automate and manage your guestOSes and the applications that run inside of them.

Additional Resources:

A Hidden vSphere 5.1 Gem - Forwarding Virtual Machine Logs (vmware.log) to Syslog Part 2

$
0
0
In Part 1I showed how you can forward virtual machine logs to ESXi syslog using an advanced virtual machine setting that was introduced in vSphere 5.1. A caveat with this solution is that the ESXi syslog file contains both system logs as well as virtual machine logs which is not very ideal from an isolation perspective. With virtual machine logs being quite verbose, if you are not forwarding logs to a remote syslog server, important system events can easily be rotated out of the local logs.

To work around this caveat, we can create a new logger specifically for handling virtual machine logs within the ESXi syslog client. You can view the existing logger types by looking in /etc/vmsyslog.conf.d directory. You will need to create a new logger configuration file which I named vmx.conf and it should contain the following:
[vmsyslog-logger]

# unique id for this logger
id = vmx

# description of this logger
descr = VMX Logs

# idents this logger is interested in
idents = vmx

# output file (e.g. foo == /var/log/foo.log)
file = vmx

# file logger class
fclass = FileLoggerSyslog

# network logger class
nclass = NetworkFilterSyslogTimestamp
Here is a screenshot of of my configuration file and noticed the highlighted text in yellow is what needs to be modified:
Note: Ensure that idents property matches the vmx.log.syslogID string specified for your virtual machines. This also means you will not be able to specify the virtual machine's name for the advanced setting, but will need to keep it generic so it can be filtered by the logger.

Once you have saved the vmx.conf configuration file, you will need to reload the ESXi syslog client for the changes to go into effect by running the following ESXCLI command:
esxcli system syslog reload
You now should see a new log file in /var/log called vmx.log which will contains only virtual machine logs:
If your ESXi host is forwarding its logs to vCenter Log Insight, you can easily create a filter for the keyword "vmx" in the log source or whatever string you decided to set it to if you are not using the default.
One final caveat to be aware of now is that the custom syslog logger (vmx.conf) will not persist after a system reboot. To preserve this file, you can either automatically re-create the file during bootup and reload syslog client using this article here OR create a custom VIB using this article here.

Quick Tip - Correlating VMFS Datastore to Storage Device Using ESXCLI

$
0
0
There was a question on Twitter this morning from AJ Kuftic on whether it is possible to display the mapping of a VMFS Datastore to its respective storage device using ESXCLI. Josh Coen beat me to the answer this morning, but yes it is possible using ESXCLI. I thought I still share this quick tip as it may not be obvious, especially when you need this information while performing a storage maintenance or troubleshooting with your storage administrator.

For those of you who are familiar with the legacy esxcfg-* commands, this information can be retrieved using the following command:
esxcfg-scsidevs -m
You can also retrieve this same information by using the following ESXCLI command (can be executed remotely as well):
esxcli storage vmfs extent list
As you can see from both screenshots, we can easily identify the name of the VMFS datastore and the specific storage device it is mapped along with other pieces of information. I prefer the ESXCLI method as it is nicely formatted along with the title header for each property.

How to run Nested RHEV Hypervisor on ESXi?

$
0
0
I have written a number of articles about VMware Nested Virtualization and even today, I am still surprised at how easy it is to virtualize not only our own hypervisor but other vendor's hypervisors as well. This week I received an interesting question from my old Technical Marketing colleague Rawlinson Rivera who wanted to run a nested RHEV (Red Hat Enterprise Virtualization) Hypervisor on ESXi. This was not something I had done before nor had any interest in doing and I told Rawlinson that it should technically work as long as the guestOS is enabled with VHV.

Rawlinson's attempt at installing RHEV resulted in the VM hanging after boot up. After a bit of research, it turns out some additional tweaks are required to get RHEV running on ESXi. I would like to give a huge thanks to Jim Mattson, one of the VMware developers who help made Nested Virtualization possible, for his assistance.

Disclaimer: This is not officially supported by VMware. Please use at your own risk.

Here are the instructions on creating a virtual machine that can be used to install RHEV (make sure you follow these exact steps, the VM must be created with these settings or it will not work):

Step 1 - Download RHEV 6.3 or 6.4 from Red Hat's website

Step 2 - Create a new Virtual Machine (vHW9) and when you get to the OS selection, you will need to select the following:
Guest Family - Other
Guest Version - Other (64-bit)
Step 3 - When you get to the virtual hardware customization, make sure you select LSI Logic SAS for the SCSI controller and also enable VHV under the CPU option.
Step 4 - Finally, you will need to add the following two advanced virtual machine settings:
vcpu.hotadd = false
apic.xapic.enable = false
Step 5 - Mount the RHEV ISO and once the VM starts to boot up, when you are presented with install/upgrade options, hit the TAB key. This will allow you to change the boot parameters and you will need to move your cursor to the left and remove "quiet" from the command-line which is right after the install keyword and then hit enter.
Note: This is required due to a known issue from Red Hat.

Step 6 - If everything was successful, you should be prompted with RHEV installer:
Step 7 - Once the installer has completed and you reboot, you now have nested RHEV running on ESXi!
Now it is time to delete the VM ;)

Quick Tip: How to Change ESXi SSH Prompt

$
0
0
This quick tip was motivated by a comment from Jason Nash where he wished the hostname of an ESXi host is automatically displayed on the SSH prompt when logging into the system. Traditionally, systems providing SSH access will default the SSH prompt to use the format of [username@hostname current-working-directory], but for an ESXi host, it just displays the current working directory.
This is not that big of an issue, unless you have multiple connections opened up to various systems which is usually the case for the average System Administrator. Being able to quickly identify the host you on are without having to run the hostname command would be nice and I can see why Jason would want to have this. Having said that, this is something you can easily configure on ESXi as well as other UNIX/Linux system in terms of customizing the SSH prompt.

To change the SSH prompt on ESXi, you will need to edit /etc/profile.local configuration file and add PS1 environmental variable which controls the SSH prompt. The configuration file is automatically backed up and all changes will persist through a reboot.

If you want to enable the basic [username@hostname current-working-directory], add the following to the file:
PS1="[\u@\h:\w] "
Now when you login to your ESXi host, the SSH prompt will look like this:
You can even add colors to your SSH prompt, if you add the following to the file:
PS1="\e[0;41m[\u@\h \W]\$ \e[m"
It will look like this:
The above are just examples of the customization you can apply to the SSH prompt, for more options you can take a look at this reference or search for others online. You can also quickly test your changes by just setting the PS1 variable on the command-line and then logging in.

Since this is something that has annoyed me from time to time, I will be filing a Feature Request with engineering and hopefully we can have this as a default in the future. Thanks Jason for bringing this up!

Did you know that VMware Host Profile is extensible by 3rd Parties?

$
0
0
Managing ESXi host configurations can be challenging and the potential risk for configuration drift between the running environment and the set of configuration scripts or worse, manual configuration is quite high. On top of that, how do you ensure proper compliance of all your ESXi host configurations in your environment and easily prove that in an internal or security audit?

This is where VMware Host Profile can help which allows administrators to capture the running configurations of an ESXi host and automatically creating a template (Host Profile) that can then be applied across new or existing ESXi hosts. By leveraging Host Profile, administrators can ensure that all their ESXi host configurations are always consistent and configuration drifts can easily be prevented through automatic compliance checks.
Recently, while searching for something on VMware's HCL website, I accidentally stumbled onto what appears to be 3rd party Host Profiles? There were only two listed, one from Brocade for managing and configuring Brocade storage adapters and the other from Dell for managing and configuring Dell's EqualLogic MEM (Multipathing Extension Module). I was actually quite surprise to learn about these custom 3rd party Host Profiles. In doing a bit of digging and research it turns out that VMware Host Profile are in fact extensible by design, which was something new to me.

Note: For a technical overview of Host Profile, you can take a look at this whitepaper here

Host Profile Architecture


Host Profile was first introduced with the release of vSphere 4.1 and the brain of the system is known as the Host Profile Engine which was part of the vCenter Server. In vSphere 5.0, Host Profile was re-architected and the Host Profile Engine was moved into the ESXi host which allowed for Host Profile Plugins to be added to an ESXi Image and expose new Host Profiles through the Host Profile Engine.
A Host Profile is actually a hierarchical composition of multiple sub-profiles and policies. Each policy defines a set of parameters that a user can select from and apply to an ESXi host. For instance, the default VMware Host Profile is composed up of 12 individual sub-profiles: authentication, datetime, firewall, memory, network, option, security, service, storage, userAccount and userGroupAccount.
With this new re-architecutre, Host Profile can be extended by 3rd party partners/vendors to create custom Host Profile Plugins to expose vendor specific hardware or software configurations and made available through a common Host Profile API/UI for customers to consume.

Host Profile Extensibility Options


To build a Host Profile Plugin, you will need to use the Host Profile SDK which is only available as part of VMware TAP (Technology Alliance Partner) Program. A Host Profile Plugin basically wraps the actual configuration work and can be backed by one of three ways:
  1. CIM Provider using the CIM SDK
  2. ESXCLI plugins
  3. Userworld binaries
As you can see, creating a Host Profile Plugin is quite flexible and can be exposed through several mechanisms. The most shocking discovery that I found was the lack of 3rd party vendor Host Profiles that exists today, especially from the big server hardware vendors. Coming from a Systems Administrator background, I would loved to have been able to configure and manage my server's firmware, BIOS, out-of-band management (iLO/DRAC), etc. through either a custom ESXCLI plugin or Host Profile Plugin. This would really benefit customers from having to manage configurations using multiple tools and allowing them centralize their management including compliance capabilities all from a single interface.

Hopefully this was an educational post for everyone and if you are a customer and would like to see certain functionality exposed by our 3rd party partners, feel free to leave a message and perhaps one of them may consider adding a custom Host Profile Plugin :)

Quick Tip: vSphere Web Client Recent History Feature

$
0
0
A customer who was also a former colleague of mines reached out to me a few days ago asking about a feature request that he would like to see in the new vSphere Web Client, which is the ability to view the recent history of inventory objects that he had navigated through. He explained that using the Inventory Navigator on the left pane of the vSphere Web Client, you can only go back to the previous inventory object.
The feature he was looking for is similar to the history feature of a web browser where you can view your recently visited websites. I know for new users of the vSphere Web Client, this is a must have feature as you are getting familiar with the new Web Client and the Inventory Navigator. This feature was actually something I and others within VMware pushed hard for while vSphere 5.1 was still in development and I knew that this feature (also known as breadcrumb) was available.

However, it might not have been obvious on where to access the recent history feature. At the very top of the Inventory Navigator, there is a tiny drop down arrow next to the selected inventory object. If you click on that, you will get a list of your recently visited inventory objects.
Once I provided the screenshot, it was exactly what he was looking for. This really comes in handy when you are jumping around and with a single click, you can easily navigate back to a previous object.

Handy Keyboard Shortcuts for the vSphere Web Client

$
0
0
After publishing an article about the vSphere Web Client Recent History Feature, I received question from a reader asking about the keyboard shortcuts that were available as part of the legacy vSphere C# Client. The reader really enjoyed these shortcuts as a way to quickly navigate between the various inventories and was wondering if similar keyboard shortcuts existed for the new vSphere Web Client? I was not able to find anything in our documentation and decided to reach out to our UE (User Experience) folks to see if they could assist.

Though we do not have every single keyboard shortcut that was available from the legacy vSphere C# Client, we actually do have quite a few and this somehow must have gotten missed during documentation (I have filed documentation bug on this). In talking to our UE folks, some of the challenges in adding the keyboard shortcuts was to find shortcuts that have not already been taken by either a web browser (vSphere Web Client is a browser application) or the Operating System used to connect to the vSphere Web Client. It was also very important if new shortcuts were added, that it would be easy to understand. As you can see this was not a trivial task at all.

The screenshot below provides a quick overview of the available keyboard shortcuts for the vSphere Web Client. Take a look at the table below for a more detailed break down of each keyboard shortcut.

Keyboard Shortcuts


Keyboard CombinationAction
Ctrl+Alt+sQuick Search
Ctrl+Alt+Home
OR
Ctrl+Alt+1
Home Screen
Ctrl+Alt+2Virtual Infrastructure Inventory
Ctrl+Alt+3Hosts and Clusters Inventory
Ctrl+Alt+4
VMs and Templates Inventory
Ctrl+Alt+5Datastores and Datastore Clusters Inventory
Ctrl+Alt+6Networking Inventory

I was able to verify these shortcuts on both a Mac OS X system as well as a on Windows. This is something I definitely will be bookmark as a useful reference. If there are other keyboard shortcuts that you have grown to rely on in the legacy vSphere C# Client and would like to see in the new vSphere Web Client, feel free to leave a comment and I will make sure it gets to our UE folks.

Does ESXi Support DDNS (Dynamic DNS)?

$
0
0
An interesting feature request that was raised internally was for ESXi to support DDNS (Dynamic DNS) which allows a host client to update it's DNS record when using a DHCP Server. In most environments, to assign a hostname from DHCP, a DHCP reservation is used and this is maintained by the DHCP Server versus DDNS, where it is maintained by the client. Thanks to my colleague Eric Wager who did some quick research and found that ESXi does in fact supports DDNS and has been since ESXi 5.0.

I have not worked with DDNS much in the past and I have only seen it used for free/paid online services targeted at consumers to provide a well known address when their public IP Address changes frequently as with most ISPs. If your DHCP Server supports DDNS, this can be a handy feature to have, especially as you add new hosts you no longer have to manually create individual DNS record before hand and great for a lab environment. I did a big more digging to have a better understanding of how DDNS works with ESXi.

To enable support for DDNS on your ESXi host, you just need to set the hostname for the following ESXi Advanced Setting:
/Misc/PreferredHostName
You can do this in a variety of ways using either the vSphere Web/C# Client or using the command-line with ESXCLI.

Here is the syntax for the command:
esxcli system settings advanced set -o /Misc/PreferredHostName -s vesxi04.primp-industries.com

Once you have configured the setting, for the changes to go into effect, you will need to restart the management network. The easiest way to do this is via DCUI which you can run remotely by just typing dcui if you have an SSH session to your ESXi host. If you are using scripted install such as Kickstart, this can easily be automated as part of the post-install and upon first boot, DDNS will be enabled and configured with the proper hostname.

To test this in my lab environment, before enabling DDNS, I performed a reverse lookup of the assigned IP Address of my ESXi host from my DHCP server. In this example, the host received the address 192.168.1.135.
As you can see from the screenshot, a hostname could not be resolved as I would expect. After our changes, if we perform the reverse lookup again, we should now see the hostname that we had configured.

Another useful tidbit is the DHCP Client on ESXi is an ISC BIND implementation and this means if you require advanced things such as authentication keys, you can configured these options in /etc/dhclient-vmkX.conf where X is the specific VMkernel interface. For most deployments, you should not have to edit this file. Also if you want to prevent your DHCP Server from overriding the hostname of your ESXi host, you can add the following entry to the dhclient-vmkX.conf configuration file:
interface vmk0 {
   supersede host-name "vesxi04.primp-industries.com";
}
Just when I thought I knew about all the awesome features ESXi offers, it is a nice surprise to learn about another one!
Viewing all 217 articles
Browse latest View live